Toyota Corolla (E170): Message Settings
1 Display the “Phone/Message Settings” screen. 2 Select “Messaging Settings”.
3 Select the desired item to be set.
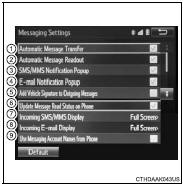
1 Set automatic message transfer on/off.
2 Set automatic message readout on/off.
3 Set the SMS/MMS notification popup on/off.
4 Set the e-mail notification popup on/off.
5 Set adding the vehicle signature to outgoing messages on/off.
6 Set updating message read status on phone on/off.
7 Change the incoming SMS/MMS display.
“Full Screen”: When an SMS/MMS message is received, the incoming SMS/MMS display screen is displayed and can be operated on the screen.
“Drop-Down”: When an SMS/MMS message is received, a message is displayed on the upper side of the screen.
8 Change the incoming e-mail display.
“Full Screen”: When an e-mail is received, the incoming e-mail display screen is the displayed and can be operated on the screen.
“Drop-Down”: When an e-mail is received, a message is displayed on the upper side of the screen.
9 Set display of messaging account names on the inbox tab on/off.
When set to on, messaging account names used on the cellular phone will be displayed.
■To return to the default volume settings
Select “Default”, and then “Yes”.
■ Displaying the “Messaging Settings” screen in a different way
1 Display the phone screen.
2 Select  .
.
3 Select “Settings”.
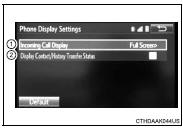
1 Change the incoming call display.
“Full Screen”: When a call is received, the hands-free screen is displayed and can be operated on the screen.
“Drop-Down”: A message is displayed on the upper side of the screen.
2 Set display of the contact/ history transfer completion message on/off.


Other materials:
Diagnostic trouble code chart
If a dtc is displayed during the dtc check, check the circuit listed in the
table below and proceed to the
page given.
* :● ... Mil light up
...
Window lock switch
Press the switch to lock the passenger window switches.
Use this switch to prevent children from accidentally opening or closing a passenger
window.
■The power windows can be operated when
► Vehicles without a smart key system
The engine switch is in the “ON” position.
υ ...
Contact/Call History Settings
The contact can be transferred from a Bluetooth® phone to the system.
The contact also can be added, edited and deleted.
The call history can be deleted and contact and favorites can be changed.
1 Display the “Phone/Message Settings” screen. 2 Select “Contact/Call History
Settings”.
3 ...