Toyota Corolla (E210) 2019-2026 Owners Manual / Vehicle specifications / Specifications / Maintenance data (fuel, oil level,
etc.)
Toyota Corolla (E210): Maintenance data (fuel, oil level, etc.)
Dimensions and weight
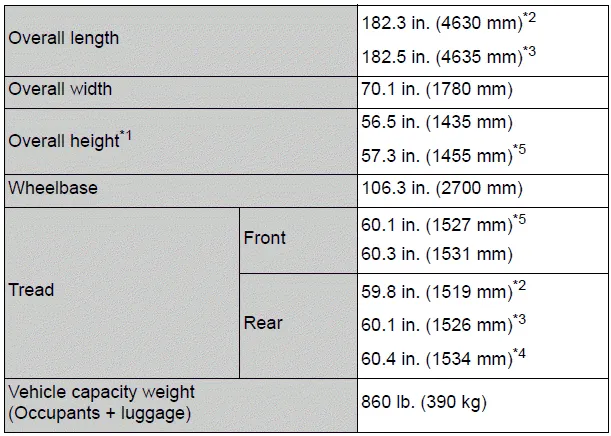
*1:Unladen vehicles
*2:Vehicles without 18-inch tires
*3:Vehicles with 18-inch tires for Guam and Saipan
*4:Vehicles with 18-inch tires except for Guam and Saipan
*5:For Guam and Saipan
Seating capacity

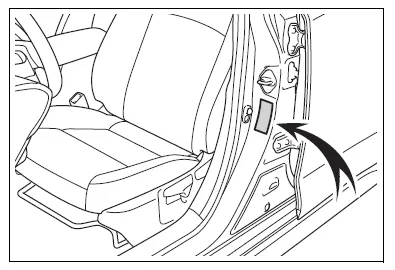
Vehicle identification
■ Vehicle identification number
The vehicle identification number (VIN) is the legal identifier for your vehicle. This is the primary identification number for your Toyota. It is used in registering the ownership of your vehicle.
On some models: This number is stamped under the right-hand front seat.
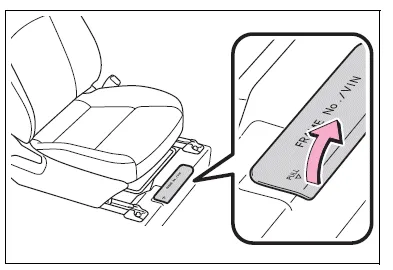
This number is also stamped on the top left of the instrument panel.

This number is also on the Certification Label.
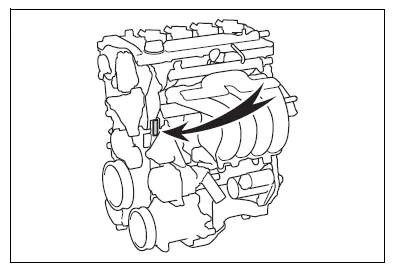
■ Engine number
The engine number is stamped on the engine block as shown.
Engine
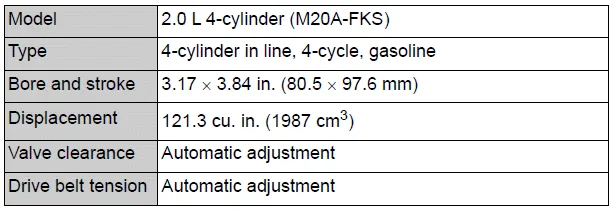
Fuel


Lubrication system
■ Oil capacity (Drain and refill [Reference*] )
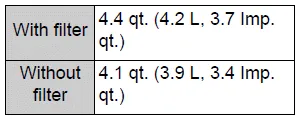
*: The engine oil capacity is a reference quantity to be used when changing the engine oil. When actually adding the engine oil, make sure that the oil level is between the low level mark and refill upper limit mark.
Warm up and turn off the engine, wait about 5 minutes, and check the oil level on the dipstick.
■ Engine oil selection
"Toyota Genuine Motor Oil" is used in your Toyota vehicle. Use Toyota approved "Toyota Genuine Motor Oil" or equivalent to satisfy the following grade and viscosity.
Oil grade: JASO GLV-1
Recommended viscosity: SAE 0W-8
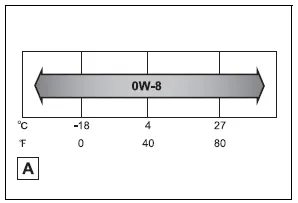
- Outside temperature
SAE 0W-8 is the best choice for good fuel economy and good starting in cold weather.
If SAE 0W-8 is not available, SAE 0W-16 oil may be used However, it must be replaced with SAE 0W-8 at the next oil change.
Oil viscosity (0W-8 is explained here as an example):
- The 0W in 0W-8 indicates the characteristic of the oil which allows cold startability. Oils with a lower value before the W allow for easier starting of the engine in cold weather.
- The 8 in 0W-8 indicates the
viscosity characteristic of the
oil when the oil is at high temperature.
An oil with a higher viscosity (one with a higher value) may be better suited if the vehicle is operated at high speeds, or under extreme load conditions.
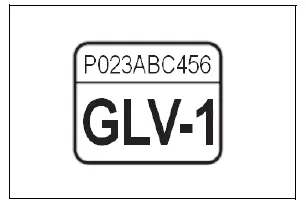
How to read oil container label: The Japanese Automotive Standards Organization (JASO) GLV-1 mark is added to some oil containers to help you select the oil you should use.
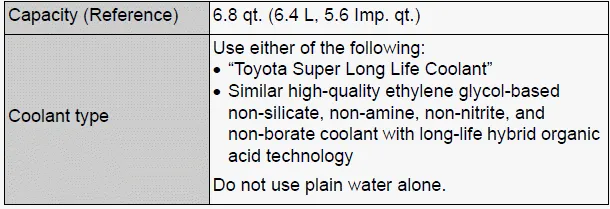
Cooling system
Ignition system (spark plug)

NOTICE
■Iridium-tipped spark plugs
Use only iridium-tipped spark plugs. Do not adjust the spark plug gap.
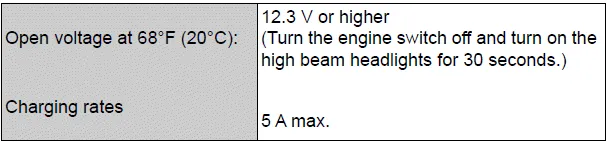
Electrical system (battery)
Continuously variable transmission

*: The fluid capacity is a reference quantity.
If replacement is necessary, contact your Toyota dealer.
NOTICE
■Continuously variable transmission fluid type
Using continuously variable transmission fluid other than the above type may cause abnormal noise or vibration, or damage the continuously variable transmission of your vehicle.
Brakes
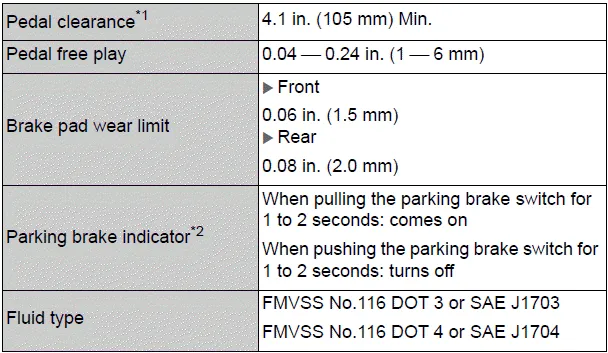
*1:Minimum pedal clearance when depressed with a force of 67.4 lbf (300 N, 30.6 kgf) while the engine is running.
*2:Make sure to confirm that the brake system warning light (yellow) does not illuminate.
Steering

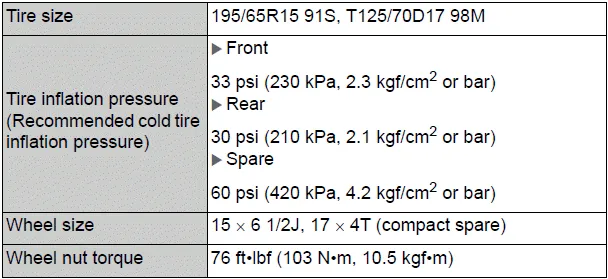
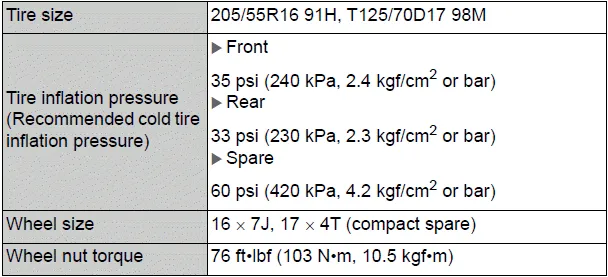
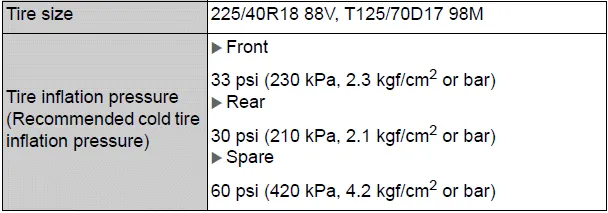
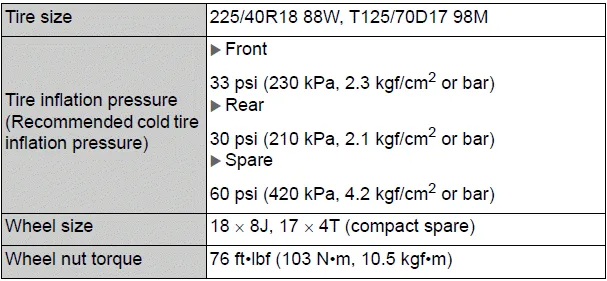
Tires and wheels
Type A
Type B
Type C

Type D
Light bulbs
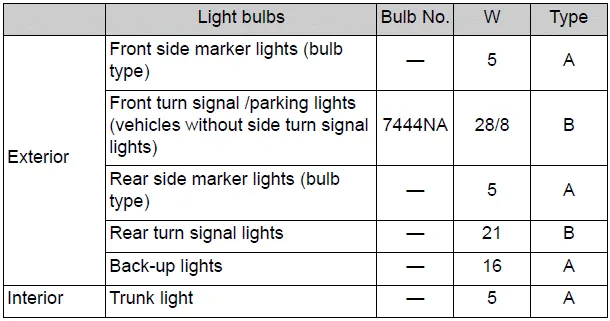
A: Wedge base bulbs (clear) B: Wedge base bulbs (amber)


Other materials:
Inspection procedure
1 Check p/t squib(lh) circuit(airbag sensor assy center – front seat
outer belt assy lh)
Disconnect the negative (–) terminal cable from the battery,
and wait at least for 90 seconds.
disconnect the connectors between the airbag sensor
assy center and the seat belt pretensio ...
Inspection
1. Power window system circuit
2. Inspect power window regulator master switch assy
Inspect the master switch continuity.
[Driver’s switch (window unlock and lock)]
Standard:
[Front passenger’s switch (window unlock)]
standard:
[Front passenger’s switch (window lock)]
...
Speedometer sensor (atm)
Replacement
1. Remove air cleaner case
2. Remove air cleaner hose no.1
3. Remove speedometer sensor
disconnect the connector.
remove the bolt and speedometer sensor assembly.
remove the clip and driven gear from the speedometer
sensor.
4. Install speedometer sensor
...