Toyota Corolla (E120): Inspection
1. Power window system circuit
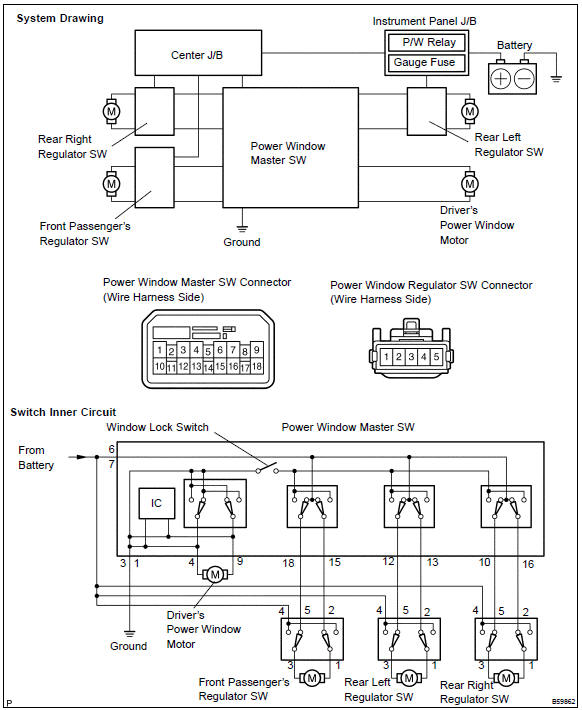
2. Inspect power window regulator master switch assy
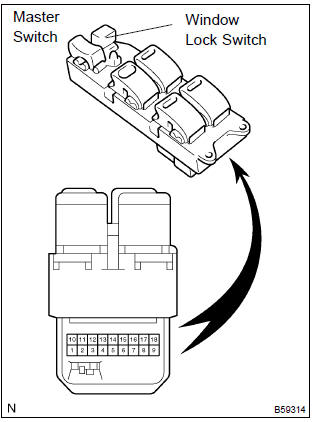
- Inspect the master switch continuity.
[Driver’s switch (window unlock and lock)]
Standard:
![[Front passenger’s switch (window unlock)]](images/books/422/47/index341.jpg)
[Front passenger’s switch (window unlock)] standard:
![[Front passenger’s switch (window lock)]](images/books/422/47/index342.jpg)
[Front passenger’s switch (window lock)] standard:
![[Rear left switch (window unlock)]](images/books/422/47/index344.jpg)
[Rear left switch (window unlock)] standard:
![[Rear left switch (window lock)]](images/books/422/47/index346.jpg)
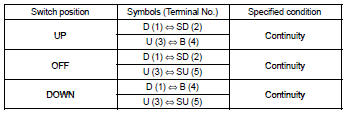
[Rear left switch (window lock)] standard:
![[Rear right switch (window unlock)]](images/books/422/47/index348.jpg)
[Rear right switch (window unlock)] standard:
![[Rear right switch (window lock)]](images/books/422/47/index350.jpg)
[Rear right switch (window lock)] standard:

If the result is not as specified, replace the master switch.
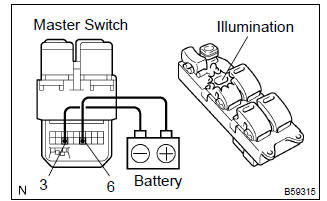
- Inspect the master switch illumination.
Standard:

If the result is not as specified, replace the master switch.
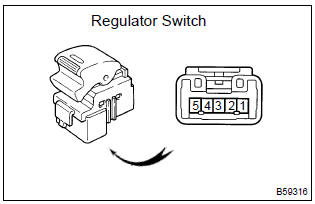
3. Inspect power window regulator switch assy
Hint
: all the regulator switches (front passenger’s, rear left, rear right) should be inspected in the same procedure.
- inspect the regulator switch continuity.
Standard:
If the result is not as specified, replace the regulator switch.
4. Inspect power window regulator motor
- Inspect the regulator motor operation.
Hint
:
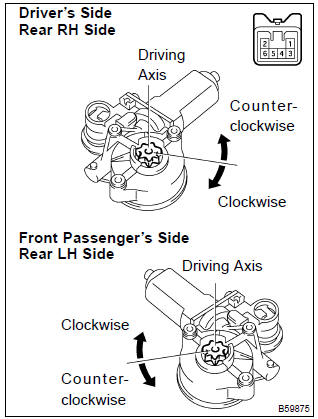
- driver’s side and rear rh regulator motors should be inspected in the same procedure.
- Passenger’s side and rear lh regulator motors should be inspected in the same procedure.
- Check that the motor operates smoothly when the battery positive voltage is applied to each terminal of the connector.
Standard [driver’s side and rear rh side]:
![Standard [front passenger’s side and rear lh side]:](images/books/422/47/index362.jpg)
Standard [front passenger’s side and rear lh side]:
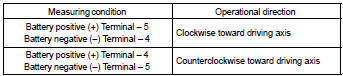
If the result is not as specified, replace the motor.
- Inspect the ptc operation inside the regulator motor.
Notice
: the inspection should be performed with the power window regulator and door glass installed to the vehicle.
- Set a dc 400 a probe of the toyota electrical tester in the wire harness of terminal 4 or 5.
Notice
: match the arrow mark of the probe with the current direction.
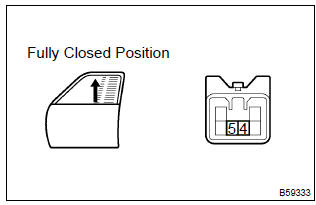
- Set the door glass in the fully closed position.
- When 60 seconds have elapsed after the door glass is fully closed, check how long it takes for the current to change from approximately 16 – 34 a into 1 a or less when the power window switch is turned up once again.
Standard: approximately 4 – 90 seconds
- When approximately 60 seconds have elapsed after the inspection of the current cut–off, check that the door glass goes down when the power window regulator switch is turned down.
If the result is not as specified, replace the motor.
5. Inspect relay (making: p/w)
- Remove the power window relay from the instrument panel j/b.
- inspect the power window relay.

If the result is not as specified, replace the relay.


Other materials:
Checking the messages
1 Display the “Message Inbox” screen.
2 Select the desired message from the list.
3 Check that the message is displayed.
1 E-mails: Select “Mark Unread” or “Mark Read” to mark mail unread or read on
the message inbox screen.
This function is available when “Update Message Read S ...
Replacement
Hint: components:
1. Precaution
2. Disconnect battery negative terminal
3. Remove air bag front rh sensor
Disconnect the connector from the airbag front rh sensor.
remove the 2 bolts and airbag front rh sensor.
4. Inspect air bag front rh sensor
5. Install air bag front rh ...
Replacement
Hint: components:
1. Precaution
2. Disconnect battery negative terminal
3. Remove front door scuff plate rh
4. Remove rear door scuff plate rh
5. Remove front door opening trim rh
6. Remove rear door opening trim rh
7. Remove lap belt outer anchor cover
8. Remove center pillar garnis ...