Toyota Corolla (E120) 2002–2008 Repair Manual / Diagnostics / Audio system / How to proceed with troubleshooting
Toyota Corolla (E120): How to proceed with troubleshooting
1 Vehicle brought to workshop

2 Customer problem analysis

3 Check and clear dtc

4 Problem symptom confirmation


Symptom does not occur (go to step 5)
5 Symptom simulation

6 Dtc check

7 Dtc chart

8 Problem symptoms table

9 Circuit inspection

10 Confirmation test
End
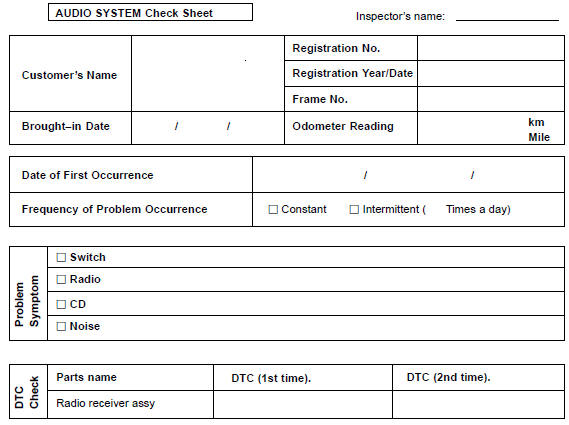
Customer problem analysis check


Other materials:
Power point socket assy rr
Replacement
Hint: components:
1. Remove parking brake hole cover sub–assy
2. Remove floor shift shift lever knob sub–assy (m/t transaxle)
3. Remove console panel upper
4. Remove console box carpet
5. Remove console box sub–assy rear (m/t transaxle)
6. Remove console box sub–assy rear ...
Inspection procedure
Hint:
if dtcs besides misfire are memorized simultaneously, first perform
the troubleshooting for them.
Read freeze frame data using the hand-held tester or the obd ii scan
tool. Freeze frame data records
the engine conditions when a malfunction is detected. When troubleshooting,
it ...
Exterior/interior trim
Preparation
Recomended tools
Equipment
Vehicle control system
Preparation
Recomended tools
...