Toyota Corolla (E210) 2019-2026 Owners Manual / Driving / Driving procedures / Selecting shift ranges in
the D position
Toyota Corolla (E210): Selecting shift ranges in the D position
To drive using temporary shift range selection, operate the "-" or "+" paddle shift switch.
When the "-" paddle shift switch is operated, the shift range switches to a range that enables engine braking force that is suitable to driving conditions. When the "+" paddle shift switch is operated, the shift range switches to a range that is one range higher than the current range.
Changing the shift range allows restriction of the highest gear, preventing unnecessary upshifting and enabling the level of engine braking force to be selected.
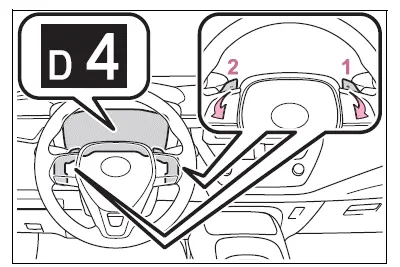
- Upshifting
- Downshifting
The selected shift range, from D1 to D10, will be displayed on the multi-information display.
■Gear step functions
- You can choose from 10 levels of engine braking force.
- A lower gear step will provide greater engine braking force than a higher gear step, and the engine speed will also increase.
■Deactivation of temporary 10-speed Sport Sequential Shiftmatic mode
In the following situations, temporary 10-speed Sport Sequential Shiftmatic mode will be deactivated:
- When the vehicle is stopped
- If the accelerator pedal is depressed continuously for more than a certain amount of time while in one gear range
- If the accelerator pedal is depressed abruptly and heavily
- When the shift lever is shifted to a position other than D
- When the "+" paddle shift switch is operated for a certain amount of time continuously


Other materials:
Headlamp dimmer switch assy
Replacement
1. Remove steering column cover lwr
Remove 3 screws and steering column cover lwr.
2. Remove headlamp dimmer switch assy
Disconnect the connector.
release the claw and pull out the head light dimmer
switch assy.
...
Front no.2 Speaker assy
Replacement
Hint: components:
1. Remove front armrest assy lh
2. Remove power window regulator master switch assy (w/ power window)
3. Remove front armrest base panel upper lh (w/o power window)
4. Remove front door window regulator handle assy (w/o power window)
5. Remove front door lower ...
Inspection procedure
1 Check fuse(ecu–ig)
Remove the ecu–ig fuse from the instrument panel j/b.
check the continuity of the ecu–ig fuse.
Ok: continuity
2 Inspect terminal voltage(b)
Remove the cruise control ecu assy with connector still
connected.
turn the ignition switch ...