Toyota Corolla (E120) 2002–2008 Repair Manual / Diagnostics / Combination meter / Entire combination meter does not operate
Toyota Corolla (E120): Entire combination meter does not operate
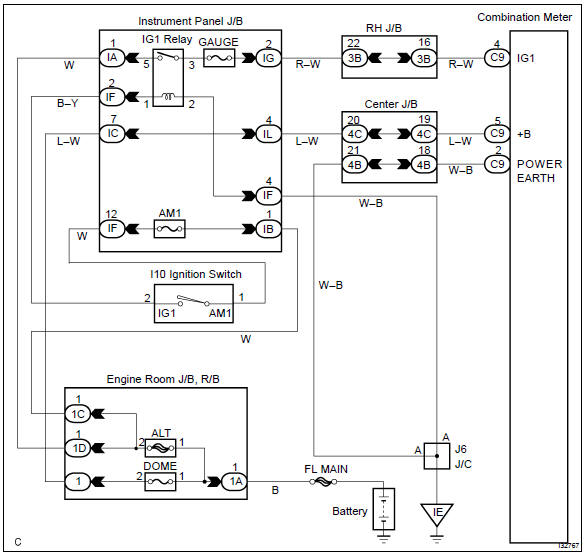
Wiring diagram
Inspection procedere
1 Check fuse
- Check that continuity exists of dome fuse.
- check that continuity exists of gauge fuse.
- check that continuity exists of am1 fuse.


2 Inspect combination meter assy

- Check continuity.
- Disconnect the ”c9” connector from combination meter assy.
- Check continuity between terminal c9–2 of combination
meter assy connector and body ground.
Ok: continuity exists
- Check voltage.
- Disconnect the ”c9” connector from combination meter assy.
- Measure voltage between terminal c9–5 of combination
meter assy connector and body ground.
Voltage: 10 – 14 v
- turn the ignition switch to on.
- Measure voltage between terminal c9–4 of combination
meter assy connector and body ground.
Voltage: 10 – 14 v


Check and replace combination meter assy


Other materials:
Inspection procedure
1 Check p/t squib(rh) circuit(airbag sensor assy center – front
seat outer belt assy rh)
Disconnect the negative (–) terminal cable from the battery,
and wait at least for 90 seconds.
disconnect the connectors between the airbag sensor
assy center and the seat belt pretensio ...
Inspection procedure
1 Check connector
Disconnect the negative (–) terminal cable from the battery, and wait at
least for 90 seconds.
check the connection of the combination meter connector and the
airbag sensor assy center connectors.
Ok:
the connectors are connected.
2 Check combination ...
Inspection procedure
Hint:
hand–held tester only:
narrowing down the trouble area is possible by performing ”a/f control” active
test (heated oxygen
sensor or other trouble areas can be distinguished).
perform active test using hand–held tester (a/f control).
Hint:
”a/f control” is the act ...