Toyota Corolla (E120): Replacement
Hint
: installation is in the reverse order of the removal. But the installation is indicated only when it has a point.
1. Remove luggage compartment door cover
2. Remove rear spoiler
- remove the 2 screws.
- disconnect the wire harness connector.
- put protective tape.
- using a heat light, heat the spoiler to 40 – 60 c (104 – 140 f).
- tie both piano wire ends to a wooden block or a similar object.
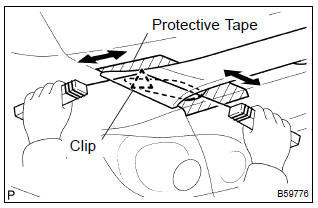
- Scrape the spoiler protector off by pulling the piano wire as shown in the illustration.
Notice
:
- if reusing the rear spoiler, take care not to damage the rear spoiler.
- Do not damage the body and wire harness.
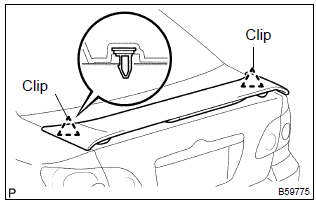
- Remove the 2 clips, wire harness grommet and rear spoiler.
3. Remove center stop lamp assy
- remove the 2 bolts and the center stop lamp assembly.
4. Install rear spoiler
- using a heat light, heat the body mounting surface to 40
– 60 c (104 – 140 f).
Notice: do not heat the body excessively.
- remove the protective tape from the body.
- wipe off the stains with cleaner.
- clean the rear spoiler (if reusing the rear spoiler).
- Using a heat light, heat the rear spoiler to 40 – 60 c
(104 – 140 f).
Notice
: do not heat the rear spoiler excessively.
- Remove the rear spoiler protector from the rear spoiler.
- Wipe off the stains with cleaner.
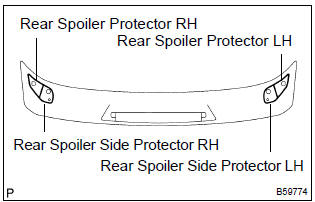
- Install 4 new rear spoiler protectors to the rear spoiler as shown in the illustration.


Other materials:
Circuit description
The p/t squib (rh) circuit consists of the airbag sensor assy center and seat
belt pretensioner (rh).
It causes the srs to deploy when the srs deployment conditions are satisfied.
Dtc b0130/63 is recorded when a short is detected in the p/t squib (rh) circuit.
Wiring diagram
...
Torque converter clutch and drive plate (atm)
Inspection
1. Inspect torque converter clutch assy
Inspect the one–way clutch.
Set sst into the inner race of the one–way clutch.
Sst 09350–32014 (09351–32010)
set sst so that it fits in the notch of the converter
hub and outer race of the one–way clutch.
...
Circuit description
Refer to dtc p0130
Dtc no.
Dtc detection condition
Trouble area
P0133
After engine has been warmed up, if response time that heated
oxygen sensor’s output voltage reaches from rich to lean.
Or from lean to rich, is 0.6 Second or more during idling.
...