Toyota Corolla (E170): Brake fluid
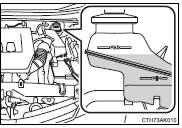
■ Checking fluid level
The brake fluid level should be between the “MAX” and “MIN” lines on the tank.
■ Adding fluid
Make sure to check the fluid type and prepare the necessary item.

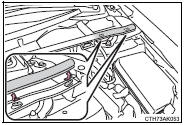
1 Slide and lift up the rubber strip to partially remove it as shown.
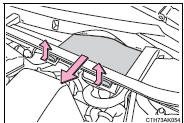
2 Disconnect the claws and remove the service cover.
3 Remove the reservoir cap.
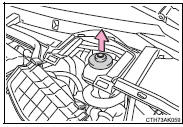
4 Add brake fluid slowly while checking the fluid level.
■Brake fluid can absorb moisture from the air
Excess moisture in the brake fluid can cause a dangerous loss of braking efficiency.
Use only newly opened brake fluid.
CAUTION
■When filling the reservoir
Take care as brake fluid can harm your hands and eyes and damage painted surfaces.
If fluid gets on your hands or in your eyes, flush the affected area with clean water immediately.
If you still experience discomfort, see a doctor.
NOTICE
■If the fluid level is low or high
It is normal for the brake fluid level to go down slightly as the brake pads wear out or when the fluid level in the accumulator is high.
However, if the reservoir needs frequent refilling, there may be a serious problem. Have the vehicle inspected at your Toyota dealer as soon as possible.


Other materials:
Overhaul
1. Inspect 4th gear thrust clearance
Using a feeler gauge, measure the 4th gear thrust clearance.
4Th gear thrust clearance:
2. Inspect 3rd gear thrust clearance
Using a dial indicator, measure the 3rd gear thrust clearance.
3Rd gear thrust clearance:
3. Inspect 4th gear ...
Customizing vehicle features
It is possible to customize the language and Eco Driving Indicator Light settings
using the “DISP” switch.
When customizing vehicle features, ensure that the vehicle is parked in a safe
place with the shift the shift lever to P (continuously variable transmission) or
N (manual transmissio ...
On–vehicle inspection
1. Check basic function (manual operation function)
turn the ignition switch on.
Check that the door glass moves up when each window switch of the
regulator master switch
assembly is turned up and moves down when each window switch is turned down.
Check that the do ...