
Toyota Corolla (E170) 2014–2019 Owners Manual / Interior features / Bluetooth® phone (Multimedia system) / Bluetooth® phone message function
Toyota Corolla (E170): Bluetooth® phone message function
Received messages can be forwarded from the connected Bluetooth® phone, enabling checking and replying using the multimedia system.
Depending on the type of Bluetooth® phone connected, received messages may not be transferred to the message inbox.
If the phone does not support the message function, this function cannot be used.
Displaying “Message Inbox” screen
1 Press the “SETUP” button.
2 Select “Phone”.
3 Select  .
.
Receiving a message
When an e-mail/SMS/MMS is received, the incoming message screen pops up with sound and is ready to be operated on the screen.
1 Select to check the message.
2 Select to refuse the message.
3 Select to call the message sender.
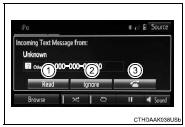
■Receiving a message
●Depending on the cellular phone used for receiving messages, or its registration status with the navigation system, some information may not be displayed.
●The pop up screen is separately available for incoming e-mail and SMS/ MMS messages under the following conditions:
E-mail:
• “Incoming E-mail Display” is set to “Full Screen”.
• “E-mail Notification Popup” is set to on.
SMS/MMS:
• “Incoming SMS/MMS Display” is set to “Full screen”.
• “SMS/MMS Notification Popup” is set to on.


Other materials:
Circuit description
Refer to dtc p0115
Dtc no.
Dtc detection condition
Trouble area
P0125
If the engine coolant temperature (ect) was less than –6.6 °C
(20 °F) when starting the engine, and 20 minutes after the engine
start, the ect sensor still indicates below 20 °C (68 ...
Using the rear view monitor system
■ Screen description
1 Vehicle width guide lines
The line indicates a guide path when the vehicle is being backed straight up.
The displayed width is wider than the actual vehicle width.
2 Vehicle center guide lines
These lines indicate the estimated vehicle center on the ground.
3 Dis ...
Inspection procedure
1 Inspect skid control ecu connector(+bs terminal voltage)
Disconnect the skid control ecu connector.
measure the voltage between terminals +bs (2) and gnd
(1, 23) of skid control ecu harness side connector.
Voltage: 10 – 14 v
2 Reconfirm dtc
Check the dtc .
Ok :
...