Toyota Corolla (E210) 2019-2026 Owners Manual / Maintenance and care / Air conditioning filter
Toyota Corolla (E210): Air conditioning filter
The air conditioning filter must be changed regularly to maintain air conditioning efficiency.
Removing the air conditioning filter
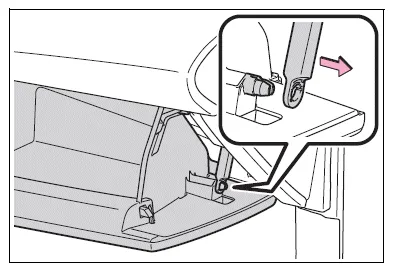
1. Turn the engine switch off.
2. Open the glove box. Slide off the damper (if equipped).
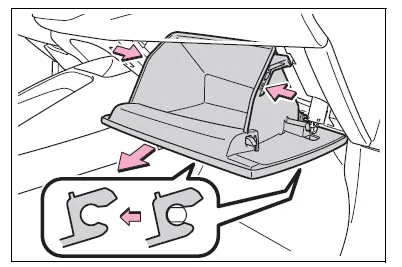
3. Push in the glove box on the vehicle's outer side to disconnect the claws. Then pull out the glove box and disconnect the lower claws.
4. Unlock the filter cover (A), pull the filter cover out of the claws (B), and remove the filter cover.
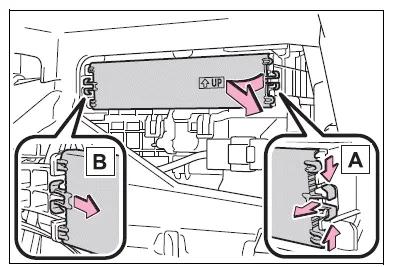
5. Remove the filter case.
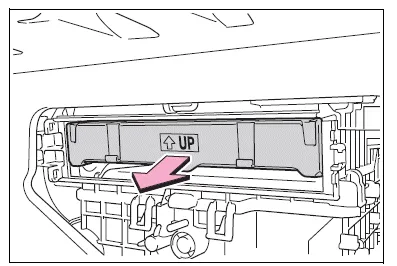
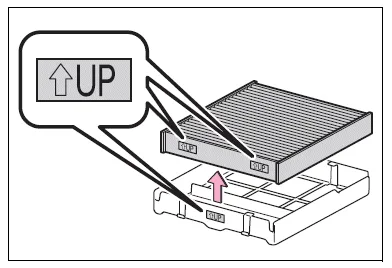
6. Remove the air conditioning filter from the filter case and replace it with a new one.
The " UP" marks shown on the
filter and the filter case should be
pointing up.
UP" marks shown on the
filter and the filter case should be
pointing up.
■Checking interval
Replace the air conditioning filter according to the maintenance schedule. In dusty areas or areas with heavy traffic flow, early replacement may be required. (For scheduled maintenance information, please refer to the "Scheduled Maintenance Guide" or "Owner's Manual Supplement".)
■If air flow from the vents decreases dramatically
The filter may be clogged. Check the filter and replace if necessary.
NOTICE
■When using the air conditioning system
Make sure that a filter is always installed.
Using the air conditioning system without a filter may cause damage to the system.
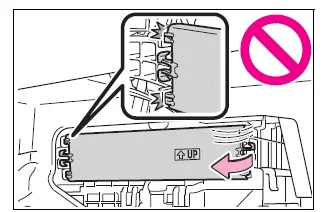
■To prevent damage to the filter cover
When moving the filter cover in the direction of arrow to release the fitting, pay attention not to apply excessive force to the claws. Otherwise, the claws may be damaged.


Other materials:
On–vehicle inspection
1. Inspect cooling system for leaks
Caution:
to avoid the danger of being burned, do not remove the radiator
cap while the engine and radiator are still hot, as fluid
and steam can be blown out under pressure.
fill the radiator with coolant and attach a radiator cap tester.
...
Circuit description
The airbag sensor front lh circuit consists of the airbag sensor assy center
and airbag sensor front lh.
Dtc b1158/b1159/16 is recorded when malfunction is detected in the airbag sensor
front lh circuit.
Wiring diagram
...
Tire rotation
Rotate the tires in the order
shown.
Front
To equalize tire wear and extend
tire life, Toyota recommends that
tire rotation is carried out at the
same interval as tire inspection.
Vehicles with a tire pressure warning
system: Do not fail to initialize
the tire pressure warning system
after tire ...