Toyota Corolla (E120): Pre–check
1. Pre–check
- Check that the cruise control actuator assy, acceleration wire, accelerator auto drive cable assy, and link assy are installed correctly and that the wire and link are securely connected.
- check that the operating movement of the acceleration pedal, cruise control actuator assy, acceleration wire, accelerator auto drive cable assy and link is smooth.
- adjust the acceleration auto drive cable assy and link system not to allow any play or excessive tension.
- check that the cruise control ecu assy, cruise control actuator assy, cruise control main switch assy and connectors of each cancel switch are connected securely.
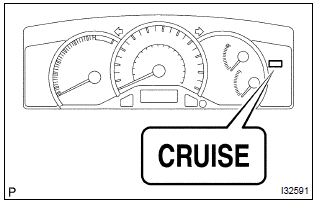
- when turning on the main switch of the cruise control main switch assy by pressing the button with the ignition switch to on, check that the cruise main indicator light in the accessory meter assy lights up.
2. Diagnosis system
- Check the indicator.
- Turn the ignition switch to on.
- Check that the cruise main indicator light comes on when the cruise control main switch button is turned on, and that the indicator light goes off when the main switch button is turned off.
Hint
: if the indicator check result is not normal, proceed to troubleshooting for the combination meter section.
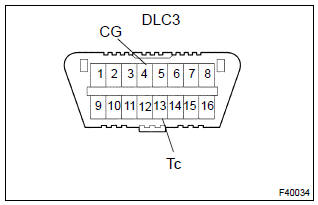
- Check the dtc using diagnosis check wire.
- Turn the ignition switch to on.
- Using sst, connect terminals tc and cg of dlc3.
Sst 09843–18040
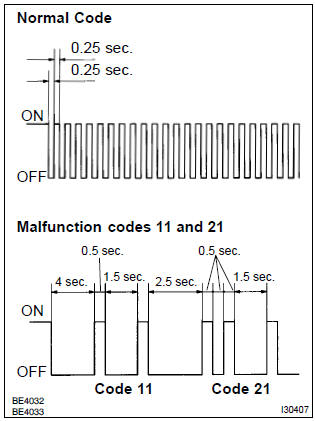
- read the dtc on the cruise main indicator light.
Hint
: if the dtc is not output, inspect the diagnosis circuit .
As an example, the blinking patterns for codes are shown in the illustration; normal, 11 and 21.
3. Using hand–held tester
- Hook up the hand–held tester to the dlc3.
- monitor the ecu data by following the prompts on the tester screen.
Hint
: the hand–held tester has a ”snapshot” function which records the monitored data.
Please refer to the hand–held tester operator’s manual for further details.
4. Dtc clearance (erase mode)
Hint
: during in the erase mode, diag detection does not work.
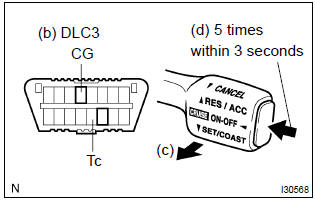
- Drive at about 15 km/h or below.
- using sst, connect terminals tc and cg of dlc3.
Sst 09843–18040
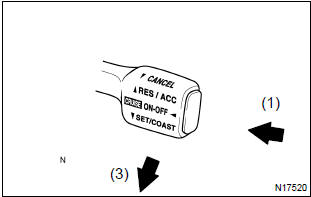
- pull the cruise control main switch assy to cancel.
- on the above mentioned condition, press on the cruise control main switch button 5 times within 3 seconds.
5. Problem symptom confirmation (road test)
- Inspect the set switch.
- Press the cruise control main switch button to on.
- Drive at a desired speed (40 km/h (25 mph) or higher).
- Push down the cruise control main switch assy to the set/coast.
- After releasing the switch, check that the vehicle cruises at the desired speed.
- Inspect the accel switch.
- Press the cruise control main switch button to on.
- Drive at a desired speed (40 km/h (25 mph) or higher).
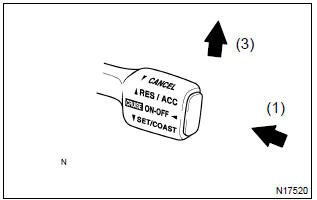
- Check that the vehicle speed is increases while the cruise control main switch assy is pull up to res/ acc, and that the vehicle cruises at the set speed when the switch is released.
- Momentarily press the cruise control main switch assy upward, to the res/acc and then immediately release it. Check that the vehicle speed increases by about 1.5 Km/h (tap–up function).

- Inspect the coast switch.
- Press the cruise control main switch button to on.
- Drive at a desired speed (40 km/h (25 mph) or higher).
- Check that the vehicle speed is decreases while the cruise control main switch assy is push down to set/coast, and the vehicle cruises at the set speed when the switch is released.
- Momentarily push the cruise control main switch assy downward to set/coast, and then immediately release it. Check that the vehicle speed decreases by about 1.5 Km/h (tap–down function).
- Inspect the cancel switch.
- Press the cruise control main switch button to on.
- Drive at a desired speed (40 km/h (25 mph) or higher).
- When operating one of the followings, check that the cruise control system is cancelled and that the normal driving mode is reset.
- Depress the brake pedal.
- Depress the clutch pedal (m/t).
- Shift to except d position (a/t).
- Press the cruise control main switch button to off.
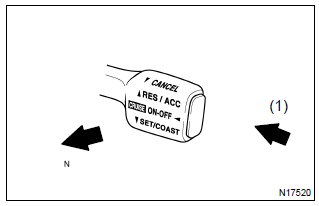
- Pull the cruise control main switch assy to cancel.

- Inspect the resume switch.
- Press the cruise control main switch button to on.
- Drive at a desired speed (40 km/h (25 mph) or higher).
- When operating one of the followings, check that the cruise control system is cancelled and that the normal driving mode is reset.
- Depress the brake pedal.
- Depress the clutch pedal (m/t).
- Shift to except d position (a/t).
- Pull the cruise control main switch assy to cancel.
- After the cruise control main switch assy is pull up to res/acc at the driving speed of more than 40 km/h (25 mph), check that the vehicle restores the speed before the cancellation.
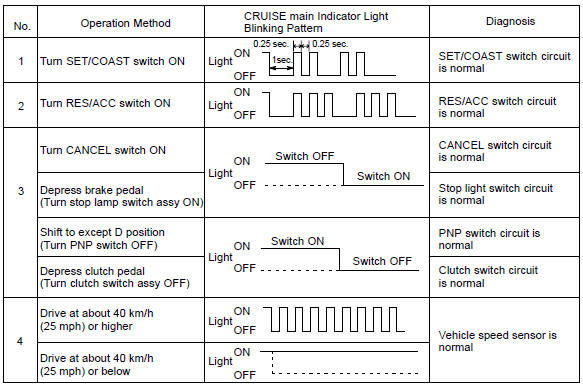
6. Input signal check
Hint
:
- for check no.1 ~ No.3 Turn the ignition switch to on.
- For check no.4
Jack up the vehicle.
Start the engine.
Release the clutch pedal (m/t).
Shift to d position (a/t).
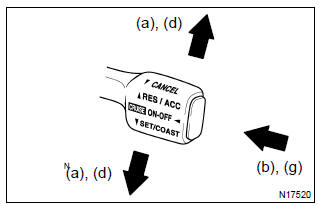
- Keep the cruise control main switch assy to set/coast or res/acc position and hold it down or hold it up.
- press the cruise control main switch button to on.
- check that the cruise main indicator light blinks twice or 3 times repeatedly after 3 seconds.
- turn the set/coast or res/acc switch to off.
- operate each switch as listed in the table below.
- read the blinking pattern of the cruise main indicator light.
- after performing the check, turn the cruise control main switch button to off.
Hint
: when 2 or more signals are input to the cruise control ecu assy, the lowest numbered code will be displayed first.
7. Auto cancel function

- If a malfunction occurs in the no.1 Vehicle speed sensors or actuator, etc. During cruise control driving, the ecu actuates auto cancel of the cruise control and turns on and off the cruise main indicator light to inform the driver of a malfunction. At the same time, the malfunction is stored in memory as a diagnostic trouble code.


Other materials:
Inspection procedure
Hint:
read freeze frame data using the hand-held tester or the obd ii scan tool.
Freeze frame data records the
engine conditions when a malfunction is detected. When troubleshooting, it is
useful for determining whether
the vehicle was running or stopped, the engine was warmed up or not, the ...
Transmitter battery
Replacement
1. Replace transmitter battery
Notice:
special caution should be taken for handling each component as they are
precision electronic components.
Using a screwdriver, pry out the transmitter case.
Notice:
do not forcibly pry out the case.
Hint:
tape the screwdriver tip ...
Inspection procedure
Hint:
read freeze frame data using the hand-held tester or the obd ii scan tool.
Freeze frame data records the
engine conditions when a malfunction is detected. When troubleshooting, it is
useful for determining whether
the vehicle was running or stopped, the engine was warmed up or not, the ...