Toyota Corolla (E120) 2002–2008 Repair Manual / Theft deterrent & door lock / Transmitter battery
Toyota Corolla (E120): Transmitter battery
Replacement
1. Replace transmitter battery
Notice:
special caution should be taken for handling each component as they are precision electronic components.

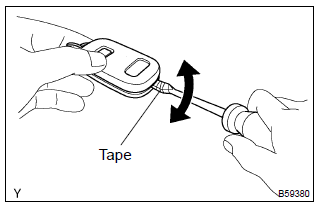
- Using a screwdriver, pry out the transmitter case.
Notice
: do not forcibly pry out the case.
Hint
: tape the screwdriver tip before use.

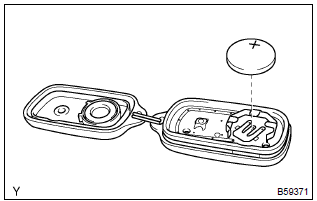
- Remove the battery (lithium battery).
Notice
:
- do not push the terminals with your finger.
- Prying up the battery (lithium battery) to forcibly remove it will cause deformation of the terminals.
- Do not touch the battery with wet hands. Water may cause unexpected rust.
- Do not touch or move any components inside the transmitter as it may interfere with proper operation.
2. Install transmitter battery
- install a new battery (lithium battery) with the positive (+) side up, as shown in the illustration.
Notice
:
- be sure that the positive side and the negative side of the transmitter battery are matched–up correctly.
- Be careful not to bend the electrode of the transmitter battery insertion.
- Be careful that dust or oil does not adhere to the transmitter case.
- install the case securely.
Other materials:
Console box
Slide the lid to the rear most
position. (vehicles with a
slide function)
Lift the lid while pulling up the
knob.
■Slide function (if equipped)
The console box lid can be slid forward or backward.
WARNING
■Caution while driving
Keep the console box closed.
Injuries may result in the ev ...
Stabilizer bar front
Replacement
Hint: components:
1. Remove front wheel
2. Remove front stabilizer link assy lh
Remove the 2 nuts and stabilizer bar link.
Hint:
if the ball joint turns together with the nut, use a hexagon
wrench (6 mm) to hold the stud.
3. Remove front stabilizer link assy rh
Hint:
...
Circuit description
The throttle position sensor is mounted in the throttle body and
detects the throttle valve opening angle.
When the throttle valve is fully closed, a voltage of approximately
0.3 To 1.0 V is applied to terminal vta of the ecm. The voltage
applied to terminal vta of the ecm increases in pro ...


