Toyota Corolla (E120) 2002–2008 Repair Manual / Diagnostics / ABS with EBD system / Right/Left rear speed sensor circuit / Inspection procedure
Toyota Corolla (E120): Inspection procedure
Hint
: start the inspection from step 1 in case of using the hand–held tester and start from step 2 in case of not using the hand–held tester.
1 Read value of hand–held tester(skid control sensor)
- Check that there is no difference between the speed value output from
the speed sensor displayed
by the hand–held tester and the speed value displayed by the speedometer
when driving the vehicle.
Ok: there is almost no difference in the displayed speed value.
Hint
: there is tolerance of ± 10 % in the speedometer indication.


2 Inspect skid control sensor
- Disconnect the skid control sensor connector.
- measure resistance between terminals 1 and 2 of the skid
control sensor connector.
Ok: resistance: 2.2 Kw or less
- measure resistance between each of terminals 1 and 2 of
skid control sensor connector and body ground.
Ok: resistance: 1 mw or higher

Notice
: check the speed sensor signal last

3 Check harness and connector(skid control sensor – skid control ecu)
- Check for open and short circuit in harness and connector between each skid control sensor and skid control ecu


4 Inspect sensor and sensor rotor serrations
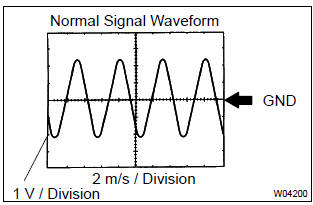
(Reference) inspection using oscilloscope
- connect the oscilloscope to the terminals rr+ – rr– and rl+ – rl– of the skid control ecu.
- drive the vehicle at about 30 km/h (19 mph), and check the signal waveform.
Hint
:
- as the vehicle speed (wheel revolution speed) increases, a cycle of the waveform becomes shorter and the fluctuation in the output voltage becomes greater.
- When noise is identified in the waveform on the oscilloscope, error signals are generated due to the speed sensor rotor’s scratches, looseness or foreign matter deposited on it.


5 Inspect sensor installation
- Check the sensor installation.
Ok: there is no clearance between the sensor and rear axle carrier.

Notice
: check the speed sensor signal last

6 Inspect skid control sensor tip
- Remove the skid control sensor .
- check the sensor tip.
Ok: no scratches or foreign objects on the sensor tip.

Notice
: check the speed sensor signal last

7 Inspect sensor rotor
- Check the sensor rotor serrations.
Ok: no scratches, missing teeth or foreign objects.

Notice
: check the speed sensor signal last

Check and replace brake actuator assy
Notice
: do not reuse skid control sensor.


Other materials:
Display and menu icons
■ Display
Driving support system status
display area
Displays an image when the following
systems are operating and a
menu icon other than is
selected:
LTA (Lane Tracing Assist)
LDA (Lane Departure Alert)
Dynamic radar cruise control
RSA (Road Sign Assist) (if
equipped)
Content disp ...
Using the interior lights
Interior lights list
1 Front interior light/personal lights
2 Rear interior light
3 Engine switch light (vehicles with a smart key system)
Front interior light/personal lights
■ Front interior light
► Type A
► Type B
1 Off
2 Door position
3 On
■ Personal li ...
Emergency towing
If a tow truck is not available in an emergency, your vehicle may be temporarily
towed using a cable or chain secured to the emergency towing eyelet. This should
only be attempted on hard surfaced roads for short distances at low speeds.
A driver must be in the vehicle to steer and operate the ...