Toyota Corolla (E170) 2014–2019 Owners Manual / Interior features / Using the interior lights
Toyota Corolla (E170): Using the interior lights
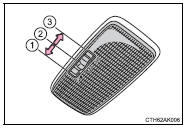
Interior lights list
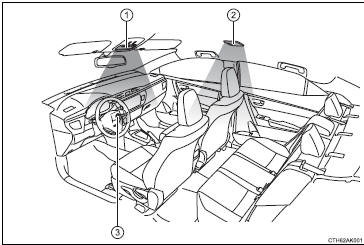
1 Front interior light/personal lights
2 Rear interior light
3 Engine switch light (vehicles with a smart key system)
Front interior light/personal lights
■ Front interior light
► Type A
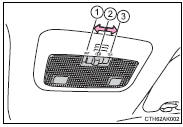
► Type B
1 Off
2 Door position
3 On
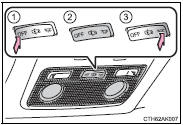
■ Personal lights
► Type A

On/off
► Type B
1 On
2 Off
When a light is on due to its door link switch, the light will not turn off even if the lens is pressed.
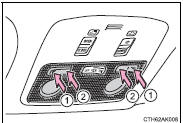
Rear interior light
1 On
2 Door position
3 Off
■Illuminated entry system
►Vehicles without a smart key system When the interior light switch is in the door position, the interior light automatically turns on/off according to the engine switch position, whether the doors are locked/unlocked and whether the doors are open/closed.
►Vehicles with a smart key system When the interior light switch is in the door position, the interior light and engine switch light automatically turn on/off according to engine switch mode, the presence of the electronic key, whether the doors are locked/unlocked and whether the doors are open/closed.
■To prevent battery discharge
The following lights will go off automatically after 20 minutes:
●Front interior light/personal lights ●Rear interior light ●Trunk light
■Customization
Setting (e.g. the time elapsed before lights turn off) can be changed.


Other materials:
Horn
To sound the horn, press on or close to the
mark.
CAUTION
■Caution while driving
Do not adjust the steering wheel while driving.
Doing so may cause the driver to mishandle the vehicle and cause an accident,
resulting in death or serious injury.
■After adjusting the steering wh ...
Circuit description
The srs warning light is located on the combination meter.
When the srs is normal, the srs warning light lights up for approx. 6 Seconds
after the ignition switch is
turned from the lock position to on position, and then turns off automatically.
If there is a malfunction in the srs, the srs ...
Circuit description
The rear heated oxygen sensor is used to monitor oxygen concentration in the
exhaust gas. For optimum
catalytic converter operation, the air fuel mixture must be maintained near the
ideal ”stoichiometric” ratio.
The heated oxygen sensor output voltage changes suddenly in the vicinity of ...