Toyota Corolla (E120): Replacement
Hint
: installation is in the reverse order of the removal. But the installation is indicated only when it has a point.
1. Remove radiator grille sub–assy
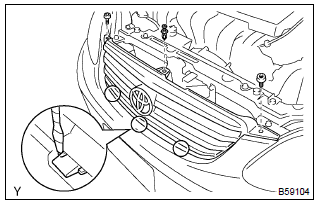
- Remove the 2 bolts and clip.
- using a screwdriver, remove the radiator grille.
Hint
: tape the screwdriver tip before use.
2. Remove front bumper cover
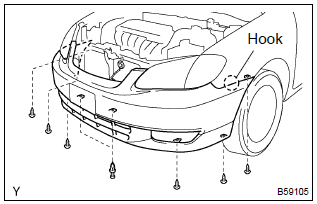
- Remove the 6 screws and 2 clips.
- disengage the hook, and remove the front bumper cover.
- w/ fog light: disconnect the fog light connectors.
3. Remove front bumper energy absorber
4. Remove front bumper reinforcement
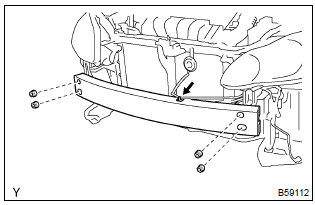
- Disconnect the wire harness clamp.
- remove the 4 nuts and front bumper reinforcement.
5. Remove front bumper side mounting bracket lh
6. Remove front bumper side mounting bracket rh
7. Remove front lh spoiler sub–assy (w/ front spoiler)
- remove the screw and 4 retainers.
- disengage the clip and front lh spoiler.
- employ the same manner described above to the other side.
8. Remove front rh spoiler sub–assy (w/ front spoiler)
9. Remove fog light unit lh (w/ fog light)
- remove the nut and fog light unit.
- employ the same manner described above to the other side.
10. Remove fog light unit rh (w/ fog light)
11. Remove front bumper hole cover lh (w/o fog light)
12. Remove front bumper hole cover rh (w/o fog light)
13. Install front bumper reinforcement
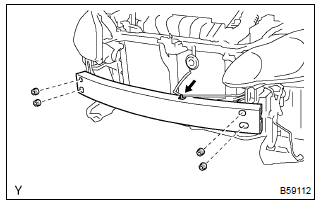
- Install the front bumper reinforcement with the 4 nuts.
Torque: 36 nvm (367 kgfvcm, 27 ftvlbf)
14. Install radiator grille sub–assy

- Install the radiator grille with the 2 bolts and clip.
Torque: 5.0 Nvm (51 kgfvcm, 44 in.Vlbf)


Other materials:
Dialing
1 Display the phone screen. 2 Select the “Dial Pad” tab and enter a phone number.
To delete the input phone number, select
.
For the first digit, you can enter “+” by selecting “*” for a while.
3 Press the switch on the steering
wheel or select . ...
Circuit description
Refer to dtc p0115
Dtc no.
Dtc detection condition
Trouble area
P0125
If the engine coolant temperature (ect) was less than –6.6 °C
(20 °F) when starting the engine, and 20 minutes after the engine
start, the ect sensor still indicates below 20 °C (68 ...
Circuit description
The actuator motor is operated by signals from the cruise control ecu assy.
Acceleration and deceleration
signals are transmitted by changes in the duty ratio (see below).
Duty ratio:
the duty ratio is the ratio of the period of continuity in one cycle. For
example, if a is the period of co ...