
Toyota Corolla (E120): Replacement
1. Drain engine oil
- remove the oil pan drain plug and drain the engine oil.
2. Removal & installation chain sub–assy
3. Remove chain vibration damper no.1
- remove 2 bolts and chain vibration damper no. 1.
4. Remove oil pump assy
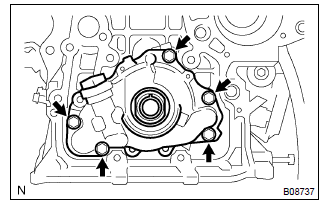
- Remove the 5 bolts.
- remove the oil pump assy and gasket.
5. Install oil pump assy
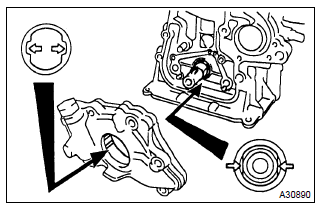
- Place a new gasket on the cylinder block.
- engage the spline teeth of the oil pump drive rotor with the large teeth of the crankshaft, and side the oil pump.
- install the oil pump with the 5 bolts.
Torque: 9.0 Nvm (92 Kgf·cm, 80 in.Vlbf)
6. Install chain vibration damper no.
1
- install the chain vibration damper no. 1 With 2 bolts.
Torque: 9.0 Nvm (92 Kgf·cm, 8.0 In.Vlbf)
7. Install oil pan drain plug
- clean and install the oil pan drain plug with a new gasket.
Torque: 37 nvm (377 Kgf·cm, 27 ft·lbf)
8. Add engine oil
Capacity:
drain and refill w/ oil filter change 3.7 Liters (3.9 Us qts, 3.3 Lmp. Qts)
drain and refill w/o oil filter change 3.5 Liters (3.7 Us qts, 3.1 Lmp. Qts)
dry fill 4.2 Liters (4.4 Us qts, 3.7 Lmp. Qts)
9. Add coolant(seepage 16–7)
10. Inspect oil leak
11. Inspect check engine coolant leak


Other materials:
When stopping the engine with the shift lever in a position other than P (vehicles
with a continuously variable transmission)
If the engine is stopped with the shift lever in a position other than P, the
engine switch will not be turned off but instead be turned to ACCESSORY mode. Perform
the following procedure to turn the switch off:
1 Check that the parking brake is set.
2 Shift the shift lever to P.
► Vehi ...
Moon roof
Use the overhead switches to open and close the moon roof and tilt it up and
down.
■ Opening and closing
1 Opens the moon roof* The moon roof stops slightly before the fully open position
to reduce wind noise.
Press the switch again to fully open the moon roof.
2 Closes the moon roof*
...
Inspection procedure
1 Check p/t squib(rh) circuit(airbaga sensor assy center – front
seat outer belt assy rh)
Disconnect the negative (–) terminal cable from the battery,
and wait at least for 90 seconds.
disconnect the connectors between the airbag sensor
assy center and the seat belt pretensi ...