Toyota Corolla (E120) 2002–2008 Repair Manual / Exhaust / Removal & installation and disassembly & reassembly
Toyota Corolla (E120): Removal & installation and disassembly & reassembly
1. Remove oxygen sensor

- Remove a clip and tear off the floor mat.
- disconnect a oxygen sensor connector.
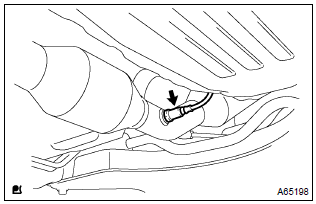
- Remove the oxygen sensor.
2. Remove tail pipe assy
- Remove 2 bolts, 2 springs and tail pipe assy.
3. Remove floor panel brace front
- Remove 2 nuts and the front floor panel brace front.
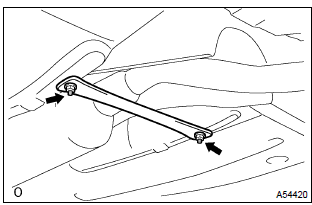
4. Remove exhaust pipe assy front
- Remove 2 bolts, 2 springs and exhaust pipe assy front.
5. Install exhaust pipe assy front
- using vernier calipers, measure the free length of the compression
spring.
Minimum length: 41.5 Mm (1.634 In.) Hint
: if the free length is less than minimum, replace the compression spring.
- install a new gasket on the exhaust manifold.
- install the exhaust pipe front with 2 bolts and 2 springs.
Torque: 43 nvm (440 Kgf·cm, 32 ft·lbf)
6. Install floor panel brace front
- install the front panel brace front with 2 nuts.
Torque: 30 nvm (302 Kgf·cm, 22 ft·lbf)
7. Install tail pipe assy
- using vernier calipers, measure the free length of the compression
spring.
Minimum length: 38.5 Mm (1.516 In.) Hint
: if the free length is less than minimum, replace the compression spring.
- install a new gasket on the exhaust pipe front.
- install the exhaust tail pipe with 2 bolts and 2 springs.
Torque: 43 nvm (440 Kgf·cm, 32 ft·lbf)
8. Install oxygen sensor

- Install the oxygen sensor to the exhaust pipe front.
Torque: 44 nvm (450 Kgf·cm, 33 ft·lbf)
- connect the oxygen sensor connector.
Hint
: after installing oxygen sensor, check that sensor wire is not twisted. If it is twisted, remove the oxygen sensor and reinstall it.
9. Check exhaust gas leak


Other materials:
Spiral cable sub–assy
Components
Replacement
Hint: components:
1. Precaution
2. Disconnect battery negative terminal
3. Place front wheels facing straight ahead
check that the front wheels are facing straight ahead.
4. Remove horn button assy
5. Remove steering wheel assy
sst 09950–50013 ...
Evap monitor (vacuum pressure monitor) (continued)
Preconditions
The monitor will not run unless:
mil is off.
Fuel level is approximately 1/2 to 3/4.
Altitude is 7800 feet (2400 m) or less.*
Engine coolant temperature (ect) is between 40°f and 95°f (4.4 °C and 35
°C).
Intake air temperature (iat) is between 40°f and 95 ...
Brake
On–vehicle inspection
1. Inspect brake line pipes and hoses
Hint:
work in a well–lighted area. Turn the front wheels fully to the
right or left before begining.
check all the brake lines and hoses for:
damage
wear
deformation
cracks
corrosion
leaks
bends
twi ...