Toyota Corolla (E210): Front seats
Adjustment procedure
Manual seat
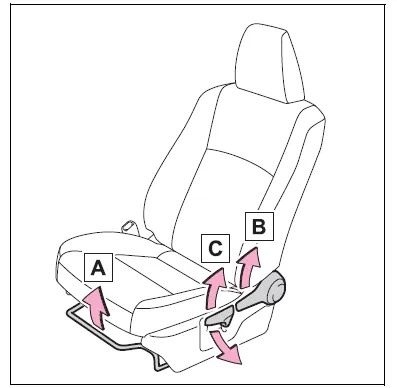
- Seat position adjustment lever
- Seatback angle adjustment lever
- Vertical height adjustment lever (driver's side only)
Power seat (driver's side only)

WARNING
■When adjusting the seat position
- Take care when adjusting the seat position to ensure that other passengers are not injured by the moving seat.
- Do not put your hands under the
seat or near the moving parts to
avoid injury.
Fingers or hands may become jammed in the seat mechanism.
- Make sure to leave enough space around the feet so they do not get stuck.
■Seat adjustment
- Be careful that the seat does not hit passengers or luggage.
- To reduce the risk of sliding
under the lap belt during a collision,
do not recline the seat
more than necessary.
If the seat is too reclined, the lap belt may slide past the hips and apply restraint forces directly to the abdomen, or your neck may contact the shoulder belt, increasing the risk of death or serious injury in the event of an accident.
Adjustments should not be made while driving as the seat may unexpectedly move and cause the driver to lose control of the vehicle.
- Manual seat only: After adjusting the seat, make sure that the seat is locked in position.
NOTICE
■When adjusting a front seat
When adjusting a front seat, make sure that the head restraint does not contact the headliner. Otherwise, the head restraint and headliner may be damaged.


Other materials:
Inspection procedure
Hand–held tester:
1 Check fuel tank cap assy(check that fuel tank cap is toyota
genuine parts)
2 Check that fuel tank cap is correctly installed
3 Inspect fuel tank cap assy
4 Check filler neck for damage
Remove the fuel tank cap.
visually check the fuel inlet pipe for ...
Precaution
1. Do not handle refrigerant in an enclosed
area or near an open flame
2. Always wear eye protection
3. Be careful not to get liquid refrigerant in your eyes or on your skin
If liquid refrigerant gets in your eyes or on your skin.
wash the area with lots of cool water.
Cautio ...
Overhaul
1. Inspect 4th gear thrust clearance
Using a feeler gauge, measure the 4th gear thrust clearance.
4Th gear thrust clearance:
2. Inspect 3rd gear thrust clearance
Using a dial indicator, measure the 3rd gear thrust clearance.
3Rd gear thrust clearance:
3. Inspect 4th gear ...