Toyota Corolla (E120): On–vehicle inspection
1. Inspect cooling system for leaks
Caution
: to avoid the danger of being burned, do not remove the radiator cap while the engine and radiator are still hot, as fluid and steam can be blown out under pressure.
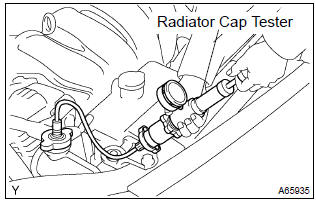
- fill the radiator with coolant and attach a radiator cap tester.
- warm up the engine.
- pump it to 118 kpa (1.2 Kgf/cm2, 17.1 Psi), and check that the pressure does not drop.
Hint
: if the pressure drops, check the hoses, radiator or water pump for leaks. If no external leaks are found, check the heater core, cylinder block and head.
2. Check engine coolant level at reservoir
- the engine coolant level should be between the ”low” and ”full” line.
Hint
: if low, check for leaks and add ”toyota long life coolant” or equivalent up to the ”full” line.
3. Check engine coolant quality
- remove the radiator cap.
Caution
: to avoid the danger of being burned, do not remove the radiator cap while the engine and radiator are still hot, as fluid and steam can be blown out under pressure.
- check if there is any excessive deposits of rust or scale around the radiator cap and radiator filler hole; the coolant should be free from oil.
Hint
: if excessively dirty, replace the coolant.
- reinstall the radiator cap.
4. Inspect fins blockage
- If fins are clogged, wash them with water or a steam cleaner and dry with compressed air.
Notice
:
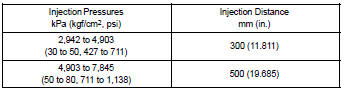
- if the distance between the steam cleaner and core is too close, there is a possibility of damaging the fins, so keep the following injection distance.
- If the fins are bent, straighten them with a screwdriver or pliers.
- Be careful not pour water directly onto electronic components.


Other materials:
Audio unit
1 Bluetooth® connection status
If “BT” is not displayed, the Bluetooth® audio/phone cannot be used.
2 Display
A message, name, number, etc. is displayed.
Lower-case characters and special characters cannot be displayed.
3 Displays the set up menu
4 Selects items such as menu and number
...
Circuit description
The actuator motor is operated by signals from the cruise control ecu assy.
Acceleration and deceleration
signals are transmitted by changes in the duty ratio (see below).
Duty ratio:
the duty ratio is the ratio of the period of continuity in one cycle. For
example, if a is the period of co ...
Driving tips
Winter driving tips
Carry out the necessary preparations and inspections before driving the vehicle
in winter. Always drive the vehicle in a manner appropriate to the prevailing weather
conditions.
Preparation for winter
● Use fluids that are appropriate to the prevailing outside temper ...