Toyota Corolla (E120) 2002–2008 Repair Manual / Theft deterrent & door lock / Wireless door lock control system / On–vehicle inspection
Toyota Corolla (E120): On–vehicle inspection
1. Inspect wireless door lock control functions
Hint
:
- the switch described in this text is a switch for transmitting signals (lock switch, unlock switch and panic switch) which is built into the door control transmitter.
- All the functions listed below must be checked in the remote control operational area.
- put the vehicle under the conditions that allow the wireless control function to be operated (see precaution on page 73–7).
- check the basic function.
- Check that all the doors lock when the lock switch is pressed.
- Check that only the driver side door unlocks when the unlock switch is pressed once and the other doors unlock when the unlock switch is pressed again within 3 seconds.
- check the chattering prevention function.
- Check that the corresponding operation occurs only once and is not repeated continuously while the switch is held. However, when the switch is operated repeatedly at 1 second intervals, check that the corresponding operation is carried out.
- check the automatic lock function.
- Check that all the doors lock automatically as long as none of them have been opened or all the doors have not been locked within approx. 30 Seconds after they are unlocked by pressing the unlock switch.
- Check that the automatic locking function does not operate when any door has been opened or all of them have been locked within approx. 30 Seconds after they are unlocked by pressing the unlock switch.
- check the switch operation fail–safe function.
- Check that the doors can not be locked using the switch while the
key is in the ignition key cylinder.
However, this does not apply when the system is in the recognition code registration mode.
- check the operation stop function when a door is open or not completely closed.
- Check that the doors are not locked by the switch while any door
is open or not completely closed.
However, the glass hatch open operation is possible in this situation.
- check the repeat function.
- Check that all the doors attempt to automatically lock once again 1 second after the lock switch has been pressed while the movement of the driver side door control knob is being restricted while in the unlocked position.
- check the hazard warning lamps flashing functions (answer–back).
- When the lock switch is pressed, check that the lamps flash once with the locking of all the doors.
- When the unlock switch is pressed once, check that the lamps flash twice with the unlocking of the driver side door.
- When the unlock switch is pressed again within 3 seconds, check that the lamps flash twice with the unlocking of all the doors.
- check the remote panic alarm function.
- Check that the horn sounds, and the headlamps, the taillamps and the hazard warning lamps flash for 60 seconds by the theft alarm function when the panic switch is pressed. Also, check that the horn stops sounding and the lamps stop flashing when either switch of the transmitter is pressed once again.
- check the illuminated entry function.
- When all the doors are locked, pressing the unlock switch causes the room lamp (when the lamp switch is in the door position) to illuminate simultaneously with the unlock operation.
- Check that the room lamp goes off in approx. 15 Seconds if doors have not been opened.
2. Check door control receiver
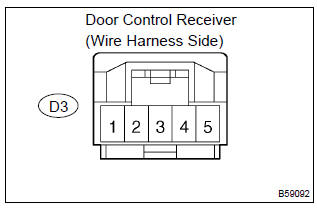
- Disconnect the d3 connector from the door control receiver.
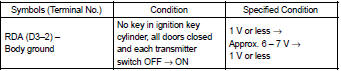
- check the continuity and voltage between the terminals of the door control receiver connector and the body ground, as shown in the illustration and table.
Standard:

If the result is not as specified, there may be a malfunction on the wire harness side.
- reconnect the connector and check the voltage between the terminal and body ground.
Standard:
If the result is not as specified, the receiver may have a malfunction.


Other materials:
Switches
Instrument panel light control dial
Automatic High Beam switch
Heated steering wheel switch*
Windshield wiper de-icer switch*
Outside rear view mirror switch
Door lock switches
Power window switches
Window lock switch
*: If equipped
Meter control switches
Paddle shift switches*1
C ...
Inspection procedure
1 Check p squib circuit(airbag sensor assy center – instrument
panel passenger airbag assy)
Disconnect the negative (–) terminal cable from the battery,
and wait at least for 90 seconds.
disconnect the connectors between the airbag sensor
assy center and the instrument panel ...
Child restraint system
fixed with a seat belt
A child restraint system for a
small child or baby must itself be
properly restrained on the seat
with the lap portion of the
lap/shoulder belt.
■ Installing child restraint
system using a seat belt
(child restraint lock function
belt)
Install the child restraint system
in accordance to the operat ...