
Toyota Corolla (E120): Dtc check/clear
1. Dtc check (normal mode)
Notice
: hand–held tester only: when the diagnostic system is switched from the normal mode to the check mode, all the dtcs and freeze frame data recorded in the normal mode will be erased. So before switching modes, always check the dtcs and freeze frame data, and note them down.
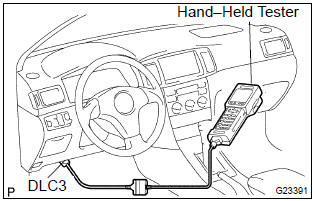
- Checking dtcs using the obd ii scan tool or hand–held tester.
- Turn the ignition switch off.
- Connect the obd ii scan tool or hand–held tester to dlc3.
- Turn the ignition switch to the on position.
- Use the obd ii scan tool or hand–held tester to check the dtcs and freeze frame data and note them down (for operating instructions, see the obd ii scan tool’s instruction book).
- to confirm the details of the dtcs.
Notice
: when simulating symptoms with an obd ii scan tool (excluding hand–held tester) to check the dtcs, use the normal mode. For codes on the dtcs chart subject to ”2 trip detection logic”, turn the ignition switch off after the symptom is simulated once. Then repeat the simulation process again. When the problem has been simulated twice, the mil is indicated on the instrument panel and dtcs are recorded in the ecm.
2. Dtc clear
- When using the obd ii scan tool or hand–held tester: clearing the dtcs.
- Connect the obd ii scan tool or hand–held tester to the dlc3.
- Turn the ignition switch to the on position.
- When operating the obd ii scan tool (complying with sae j1978) or hand–held tester to erase the codes, the dtcs and freeze frame data will be erased. (See the obd ii scan tool’s instruction book for operating instructions.)
- when not using the obd ii scan tool or hand–held tester: clearing the dtcs.
- Disconnecting the battery terminal or remove the efi and etcs fuses from the engine room j/b for 60 seconds or more.


Other materials:
Folding the mirrors
Push the mirror back in the direction of the vehicle’s rear.
■Mirror angle can be adjusted when
► Vehicles without a smart key system
The engine switch is in the “ACC” or “ON” position.
►Vehicles with a smart key system
The engine switch is in ACCESSORY or IGNITION ...
Oil filter sub–assy
Replacement
Caution:
prolonged and repeated contact with mineral oil will result in the
removal of natural fats from
the skin, leading to dryness, irritation and dermatitis. In addition, used
engine oil contains potentially
harmful contaminants which may cause skin cancer.
Exercise ...
Handling of hose clamps
Before removing the hose, check the depth of the inserting
portion and the clamp position in order to restore it
surely.
change a deformed or dented clamp for a new one.
in case of reusing the hose, install the clamp on the hose
where it has a clamp track.
for a ...