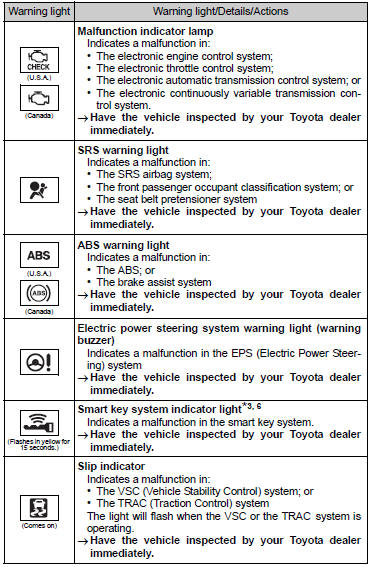
Toyota Corolla (E170) 2014–2019 Owners Manual / When trouble arises / Steps to take in an emergency / If a warning light turns on or a warning buzzer sounds / Warning light and warning buzzer list
Toyota Corolla (E170): Warning light and warning buzzer list

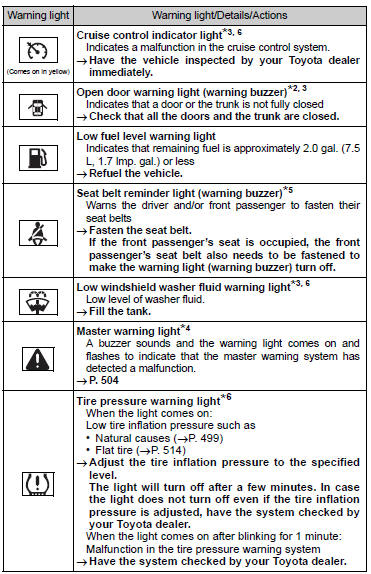
*1: Parking brake engaged warning buzzer: *2: Open door warning buzzer: *3: Vehicles with a drive monitor display *4: Vehicles with a multi-information display *5: Driver’s seat belt buzzer: Vehicles without a smart key system: The driver’s seat belt buzzer sounds to alert the driver that his or her seat belt is not fastened. Once the engine switch is turned to the “ON” position, the buzzer sounds for 6 seconds. If the vehicle reaches a speed of 12 mph (20 km/h), the buzzer sounds once.
If the seat belt is still unfastened after 30 seconds, the buzzer will sound intermittently for 10 seconds. Then, if the seat belt is still unfastened, the buzzer will sound in a different tone for 20 more seconds.
Vehicles with a smart key system: The driver’s seat belt buzzer sounds to alert the driver that his or her seat belt is not fastened. Once the engine switch is turned to IGNITION ON mode, the buzzer sounds for 6 seconds.
If the vehicle reaches a speed of 12 mph (20 km/h), the buzzer sounds once. If the seat belt is still unfastened after 30 seconds, the buzzer will sound intermittently for 10 seconds. Then, if the seat belt is still unfastened, the buzzer will sound in a different tone for 20 more seconds.
Front passenger’s seat belt buzzer: The front passenger’s seat belt buzzer sounds to alert the front passenger that his or her seat belt is not fastened. The buzzer sounds once if the vehicle reaches a speed of 12 mph (20 km/h). If the seat belt is still unfastened after 30 seconds, the buzzer will sound intermittently for 10 seconds.
Then, if the seat belt is still unfastened, the buzzer will sound in a different tone for 20 more seconds.
*6: If equipped
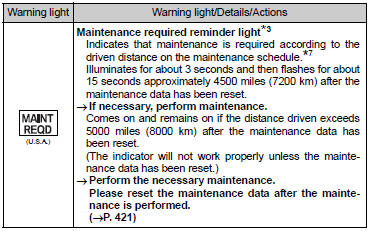
*7: Refer to the separate “Scheduled Maintenance Guide” or “Owner’s Manua


Other materials:
Cd sound skips
Inspection procedure
1 Disc cleaning
Disk cleaning
) if the disk gets dirty, clean the disk by wiping the surface
from the center to outside in the radial directions
with a soft cloth.
Notice:
do not use a conventional record cleaner or anti–static preservative.
Standard: ...
On–vehicle inspection
1. Check cooling fan operation with low temperature (below 83 c (181 f))
Turn the ignition switch on.
check that the cooling fan stops.
Hint:
if not, check the cooling fan relay and water temperature sensor, and check for
separated connector or severed
wire between the cooling fan ...
Follow the correction procedures. (vehicles with a smart key system and with
a drive monitor display)
After taking the specified steps to correct the suspected problem, check that
the warning light turns off.
■SRS warning light
This warning light system monitors the airbag sensor assembly, front impact
sensors, side impact sensors (front door), side impact sensors (front), side impac ...