Toyota Corolla (E120): Inspection procedure
1 Inspect transmission wire(s1)
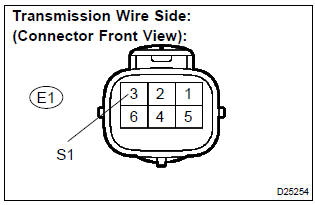
- Disconnect the transmission wire connector from the transaxle.
- measure the resistance according to the value(s) in the table below.
Standard:


2 Check harness and connector(transmission wire – ecm)
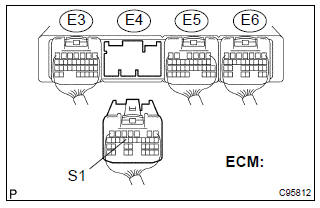
- Connect the transmission connector to the transaxle.
- disconnect the connector from the ecm.
- measure the resistance according to the value(s) in the table below.
Standard:


Replace ecm
3 Inspect shift solenoid valve(s1)
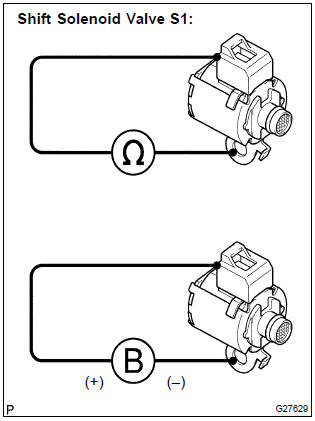
- Remove the shift solenoid valve s1.
- measure the resistance according to the value(s) in the table below.
Standard:

- Connect the positive (+) battery lead to the solenoid connector terminal, and the negative (–) battery lead to the solenoid body for checking the solenoid valve operation.
Standard: the solenoid makes an operating noise.


Repair or replace transmission wire


Other materials:
Listening to an iPod
Connecting an iPod enables you to enjoy music from the vehicle speakers.
Select “iPod” on the audio source selection screen.
When the iPod connected to the system includes iPod video, the system can only
output the sound by selecting the browse screen.
Connecting an iPod
Audio control scre ...
On–vehicle inspection
1. Install lspv gauge (sst) and bleed air
remove the bleeder plugs from the front and rear brake cylinder.
install the lspv gauge (sst), and bleed the air.
Sst 09709–29018
2. Raise master cylinder pressure and check rear wheel cylinder pressure
Hint:
when inspectin ...
Adjustment
1. Inspect and adjust clutch pedal sub–assy
Turn over the floor carpet.
check that the pedal height is correct.
Pedal height from asphalt sheet:
135.8 – 145.8 Mm (5.346 – 5.740 In.)
adjust the pedal height.
Loosen the lock nut and turn the stopper bolt until
...