Toyota Corolla (E120) 2002–2008 Repair Manual / Diagnostics / Sfi system / Evaporative emission control
system leak detected / Inspection procedure
Toyota Corolla (E120): Inspection procedure
Hand–held tester:
1 Check fuel tank cap assy(check that fuel tank cap is toyota genuine parts)


2 Check that fuel tank cap is correctly installed


3 Inspect fuel tank cap assy


4 Check filler neck for damage
- Remove the fuel tank cap.
- visually check the fuel inlet pipe for damage.
- reinstall the fuel tank cap.


5 Perform active test by hand–held tester(check for evap purge flow)
- Select the item ”diagnosis/enhanced obd ii/active test” mode on the hand–held tester.
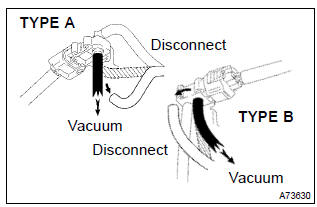
- disconnect the vacuum hose of the vsv for evap from the charcoal canister.
- start the engine.
- select the item ”evap vsv (alon)/all” in the active test and operate evap vsv (press the right or left button).
- when the vsv for the evap is operated by the hand–held
tester, check whether the disconnected hose applies suction
to your finger.
Result: vsv is on: disconnected hose sucks.
Vsv is off: disconnected hose does not suck.
- reconnect the vacuum hose.


6 Check vacuum hoses(intake manifold – vsv for evap, vsv for evap – charcoal canister)
- Check that the vacuum hose is connected correctly.
- check the vacuum hose for looseness and disconnection.
- check the vacuum hose for cracks, hole, damage and blockage.


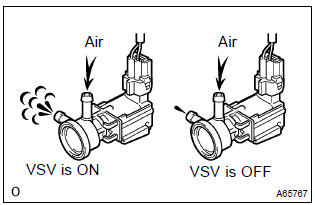
7 Inspect vsv for evap(operation)


8 Check harness and connector(efi relay – vsv for evap, vsv for evap – ecm)
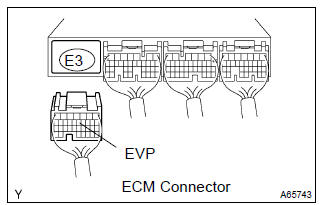
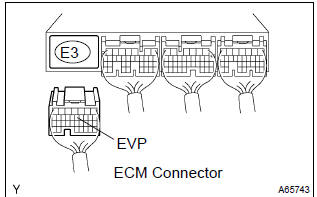
- Check the harness and the connector between the vsv for evap and ecm.
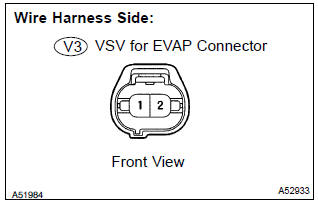
- Disconnect the v3 vsv for evap connector.
- Disconnect the e3 ecm connector.
- Check the resistance between the wire harness side connectors.
Standard (check for open):

Standard (check for short):

- Reconnect the vsv for evap connector.
- Reconnect the ecm connector.
- check the harness and the connector between the vsv for evap and efi relay.
- Disconnect the v3 vsv for evap connector.
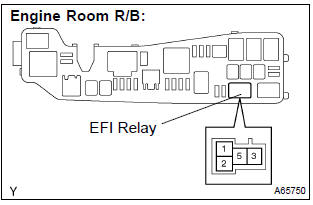
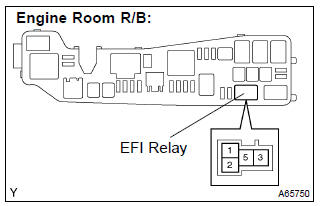
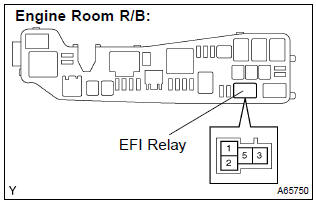
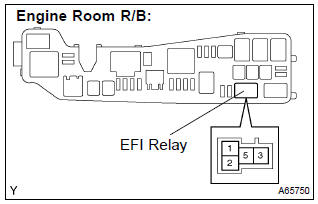
- Remove the efi relay from the engine room r/b.
- Check the resistance between the wire harness side connectors.
Standard (check for open):

Standard (check for short):

- Reconnect the vsv for evap connector.
- Reinstall the efi relay.


Replace ecm
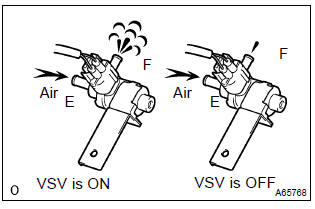
9 Perform active test by hand–held tester(vsv for ccv)
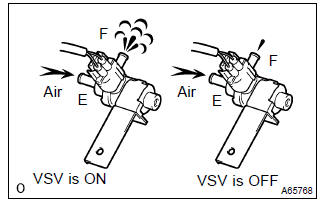
- Disconnect the vacuum hose of the vsv for ccv from the charcoal canister.
- start the engine.
- select the item ”diagnosis/enhanced obd ii/active test” mode on the hand–held tester.
- select the item ”can ctrl vsv/all” in the active test and operate can ctrl vsv (press the right or left button).
- check the vsv operation when it is operated by the hand–held tester.
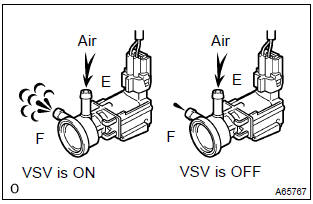
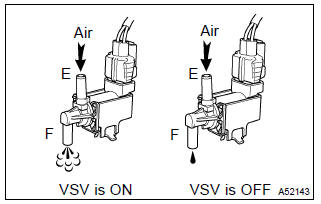
Result: vsv is on: air from port e flows out through port f.
Vsv is off: air does not flow from port e to port f.


10 Check vacuum hoses(vsv for ccv – charcoal canister)
- Check that the vacuum hose is connected correctly.
- check the vacuum hose for looseness and disconnection.
- check the vacuum hose for cracks, hole damage and blockage.


11 Inspect vsv for ccv(operation)


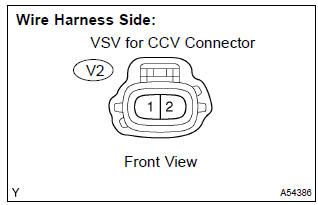
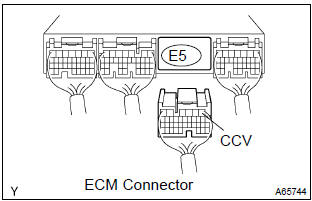
12 Check harness and connector(efi relay – vsv for ccv, vsv for ccv – ecm)
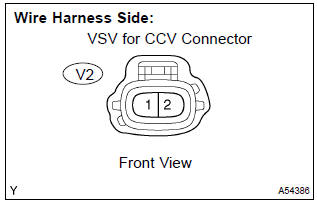
- Check the harness and connector between the vsv for ccv and ecm.
- Disconnect the v2 vsv for ccv connector.
- Disconnect the e5 ecm connector.
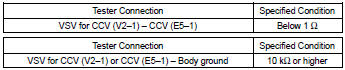
- Check the resistance between the wire harness side connectors.
Standard (check for open):

- Reconnect the vsv for ccv connector.
- Reconnect the ecm connector.
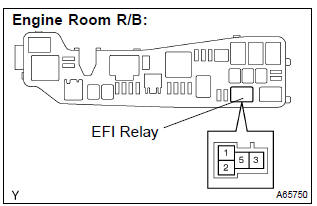
- check the harness and the connector between the vsv for ccv and efi relay.
- Disconnect the v2 vsv for ccv connector.
- Remove the efi relay from the engine room r/b.
- Check the resistance between the wire harness side connectors.
Standard (check for open):

Standard (check for short):

- Reconnect the vsv for ccv connector.
- Reinstall the efi relay.


Replace ecm
13 Perform active test by hand–held tester(vsv for pressure switching valve)
- Select the item ”diagnosis/enhanced obd ii/active test” mode on the hand–held tester.
- select the item ”tank bypass vsv/all” in the active test and operate tank bypass vsv (press the right or left button).
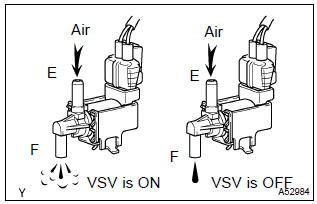
- check the vsv operation when it is operated by the hand–held tester.
Result: vsv is on: air from port e flows out through port f.
Vsv is off: air does not flow from port e to port f.


14 Inspect vsv for pressure switching valve(operation)


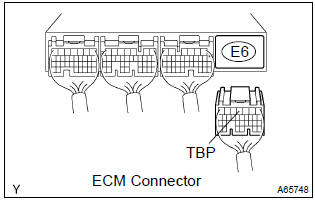
15 Check harness and connector(efi relay – vsv for pressure switching valve, vsv for pressure switching valve – ecm)
- Check the harness and the connector between the vsv for pressure switching valve and the ecm.
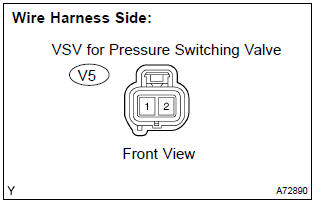
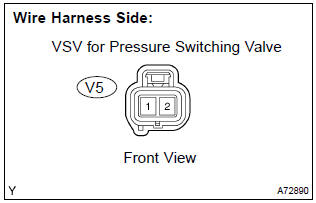
- Disconnect the v5 vsv for pressure switching valve connector.
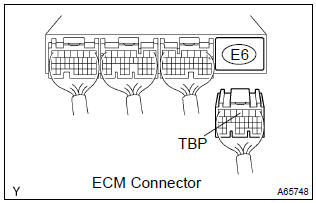
- Disconnect the e6 ecm connector.
- Check the resistance between the wire harness side connectors.
Standard (check for open):

Standard (check for short):

- Reconnect the vsv for pressure switching valve connector.
- Reconnect the ecm connector.
- check the harness and the connector between the vsv for pressure switching valve and efi relay.
- Disconnect the v5 vsv for pressure switching valve connector.
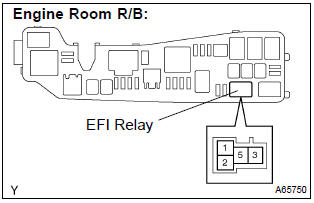
- Remove the efi relay from the engine room r/b.
- Check the resistance between the wire harness side connectors.
Standard (check for open):

Standard (check for short):

- Reconnect the vsv for pressure switching valve connector.
- Reinstall the efi relay.


Replace ecm
16 Check for evaporative emissions leak(near fuel tank)
- Check whether hoses close to the fuel tank have been modified, and check if there are signs of any accident near the fuel tank.
- Check the following parts for cracks, deformation or loose connection:
- fuel tank
- fuel tank filler pipe
- hoses and tubes around fuel tank


17 Check vacuum hoses(vapor pressure sensor – fuel tank, charcoal canister – vsv for pressure switching valve)
- Check that the vacuum hose is connected correctly.
- check the vacuum hose for looseness and disconnection.
- check the vacuum hose for cracks, hole and damage.


18 Check hose and tube(fuel tank – charcoal canister)
- Check the connection between the fuel tank and fuel evap pipe, the fuel evap pipe and under floor fuel tube, the under floor fuel tube and charcoal canister.
- check the hose and the tube for cracks, hole and damage.


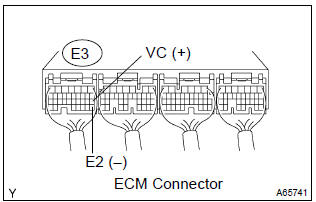
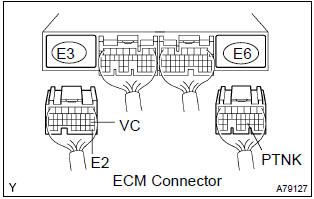
19 Inspect ecm(vc voltage)
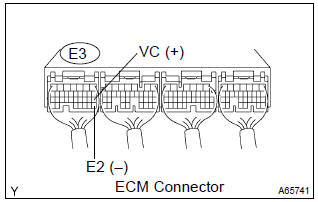
- Turn the ignition switch on.
- measure the voltage between the terminals of the e3 ecm connector.
Standard:


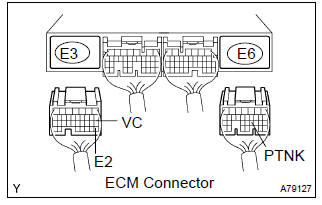
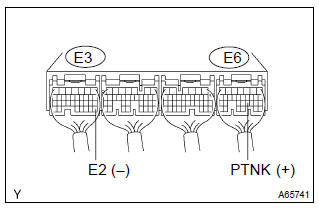
20 Inspect ecm(ptnk voltage)
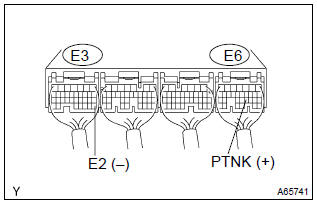
- Turn the ignition switch on.
- measure the voltage between terminals of the e3 and e6 ecm connectors.
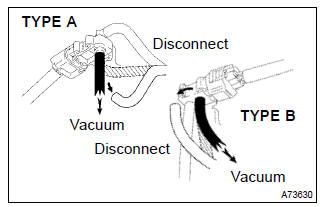
- Disconnect the vacuum hose from the vapor pressure sensor.
Standard (1):

Notice
: the vacuum applied to the vapor pressure sensor must be less than 66.7 Kpa (500 mmhg, 19.7 In.Hg).
- Using the mityvac (hand–held vacuum pump), apply a vacuum of 4.0 Kpa (30 mmhg, 1.18 In.Hg) to the vapor pressure sensor.
Standard (2):

- Reconnect the vacuum hose.


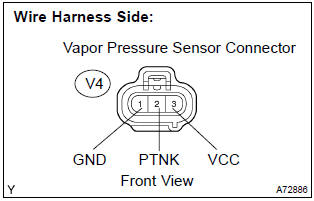
21 Check harness and connector(vapor pressure sensor – ecm)
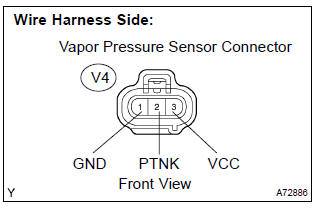
- Disconnect the v4 vapor pressure sensor connector.
- disconnect the e3 and e6 ecm connectors.
- check the resistance between the wire harness side connectors.
Standard (check for open):

Standard (check for short):

- Reconnect the vapor pressure sensor connector.
- reconnect the ecm connectors.


Replace ecm
22 Inspect fuel tank inlet valve assy


23 Inspect fuel tank assy


24 Inspect charcoal canister assy(cracks, hole and damage)


Replace ecm
Obdii scan tool (excluding hand–held tester):
1 Check fuel tank cap assy(check that fuel tank cap is toyota gehuine parts)


2 Check that fuel tank cap is correctly installed


3 Inspect fuel tank cap assy


4 Check filler neck for damage
- Remove the fuel tank cap.
- visually check the fuel inlet pipe for damage.


5 Check for evaporative emissions leak(near fuel tank or chacoal canister)
- Check whether hoses close to the fuel tank have been modified, and check if there are signs of any accident near the fuel tank or the charcoal canister.
- Check the following parts for cracks, deformation or loose connection:
- fuel tank
- charcoal canister
- fuel tank filler pipe
- hoses and tubes around fuel tank and charcoal canister


6 Check vacuum hoses(vapor pressure sensor – fuel tank, charcoal canister – vsv for pressure switching valve)
- Check that the vacuum hose is connected correctly.
- check the vacuum hose for looseness and disconnection.
- check the vacuum hose for cracks, hole and damage.


7 Check hose and tube(fuel tank – charcoal canister)
- Check the connection between the fuel tank and fuel evap pipe, the fuel evap pipe and under floor fuel tube, the under floor fuel tube and charcoal canister.
- check the hose and the tube for cracks, hole and damage.


8 Check vacuum hoses((5), (6), (7), (8) and (9) in fig. 1 In circuit description)
- Check that the vacuum hose is connected correctly.
- check the vacuum hose for looseness and disconnection.
- check the vacuum hose for cracks, hole and damage.


9 Check each vsv connector for looseness and disconnection(vsv for evap, vsv for ccv, vsv for pressure switching valve)


10 Inspect charcoal canister assy(cracks, hole and damage)


11 Inspect ecm(vc voltage)
- Turn the ignition switch on.
- measure voltage between the terminals of the e3 ecm connector.
Standard:


12 Inspect ecm(ptnk voltage)
- Turn the ignition switch on.
- measure the voltage betwen terminals of the e3 and e6 ecm connectors.
- Disconnect the vacuum hose from the vapor pressure sensor.
Standard (1):

Notice
: the vacuum applied to the vapor pressure sensor must be less than 66.7 Kpa (500 mmhg, 19.7 In.Hg).
- Using the mityvac (hand–held vacuum pump), apply a vacuum of 4.0 Kpa (30 mmhg, 1.18 In.Hg) to the vapor pressure sensor.
Standard (2):

- Reconnect the vacuum hose from the vapor pressure sensor.


13 Check harness and connector(vapor pressure sensor – ecm)
- Disconnect the v4 vapor pressure sensor connector.
- disconnect the e3 and e6 ecm connectors.
- check the resistance between the wire harness side connectors.
Standard (check for open):

Standard (check for short):

- Reconnect the vapor pressure sensor connector.
- reconnect the ecm connectors.


Replace ecm
14 Inspect vsv for evap(function)
- Turn the ignition switch on.
- check the vsv function.
- Connect between terminals evp and e2 of the
ecm connector (vsv on).
Vsv is on: air from port e flows out through port f
- disconnect between terminals evp and e2 of the
ecm connector (vsv off).
Vsv is off: air does not flow port e to port f


15 Inspect vsv for evap(operation)


16 Check harness and connector(efi relay – vsv for evap, vsv for evap – ecm)

- Check the harness and connector between the vsv for evap and ecm.
- Disconnect the v3 vsv for evap connector.
- Disconnect the e3 ecm connector.
- Check the resistance between the wire harness side connectors.
Standard (check for open):

Standard (check for short):

- Reconnect the vsv for evap connector.
- Reconnect the ecm connector.
- check the harness and connector between the vsv for evap and efi relay.
- Disconnect the v3 vsv for evap connector.
- Remove the efi relay from the engine room r/b.
- Check the resistance between the wire harness side connectors.
Standard (check for open):

Standard (check for short):

- Reconnect the vsv for evap connector.
- Reinstall the efi relay.


Replace ecm
17 Inspect vsv for ccv(function)
- Turn the ignition switch on.
- check the vsv function.
- Connect between terminals ccv and e2 of the
ecm connector (vsv on).
Vsv is on: air from port e flows out through port f
- disconnect between terminals ccv and e2 of the
ecm connector (vsv off).
Vsv is off: air does not flow from port e to port f


18 Inspect vsv for ccv(operation)


19 Check harness and connector(efi relay – vsv for ccv, vsv for ccv – ecm)
- Check the harness and the connector between the vsv for ccv and ecm.
- Disconnect the v2 vsv for ccv connector.
- Disconnect the e5 ecm connector.
- Check the resistance between the wire harness side connectors.
Standard (check for open):

Standard (check for short):

- Reconnect the vsv for ccv connector.
- Reconnect the ecm connector.
- check the harness and the connector between the vsv for ccv and efi relay.
- Disconnect the v2 vsv for ccv connector.
- Remove the efi relay from the engine room r/b.
- Check the resistance between the wire harness side connectors.
Standard (check for open):

Standard (check for short):

- Reconnect the vsv for ccv connector.
- Reinstall the efi relay.


Replace ecm
20 Inspect vsv for pressure switching valve(function)
- Turn the ignition switch on.
- check the vsv function.
- Connect between terminals tbp and e2 of the ecm
connector (vsv on).
Vsv is on: air from port e flows out through port f
- disconnect between terminals tbp and e2 of the
ecm connector (vsv off).
Vsv is off: air does not from flow port e to port f


21 Inspect vsv for pressure switching valve(operation)


22 Check harness and connector(efi relay – vsv for pressure switching valve, vsv for pressure switching valve – ecm)
- Check the harness and the connector between the vsv for pressure switching valve and ecm.
- Disconnect the v5 vsv for pressure switching valve connector.
- Disconnect the e6 ecm connector.
- Check the resistance between the wire harness side connectors.
Standard (check for open):

Standard (check for short):

- Reconnect the vsv for pressure switching valve connector.
- Reconnect the ecm connector.
- check the harness and the connector between the vsv for pressure switching valve and efi relay.
- Disconnect the v5 vsv for pressure switching valve connector.
- Remove the efi relay from the engine room r/b.
- Check the resistance between the wire harness side connectors.
Standard (check for open):

Standard (check for short):

- Reconnect the vsv for pressure switching valve connector.
- Reinstall the efi relay from.


Replace ecm
23 Inspect fuel tank inlet valve assy


24 Inspect fuel tank assy


It is likely that vehicle user did not properly close fuel tank cap


Other materials:
Tire & wheel
Wheel and tire system
Inspection
1. Inspect tire
check the tires for wear and proper inflation pressure.
Cold tire inflation pressure:
Using a dial indicator, check the tire runout.
Tire runout: 3.0 Mm (0.118 In.) Or less
2. Rotate tire
Hint:
see the illustration ...
Entire combination meter does not operate
Wiring diagram
Inspection procedere
1 Check fuse
Check that continuity exists of dome fuse.
check that continuity exists of gauge fuse.
check that continuity exists of am1 fuse.
2 Inspect combination meter assy
Check continuity.
Disconnect the ” ...
If you think something is wrong
If you notice any of the following symptoms, your vehicle probably needs adjustment
or repair. Contact your Toyota dealer as soon as possible.
Visible symptoms
● Fluid leaks under the vehicle.
(Water dripping from the air conditioning after use is normal.)
● Flat-looking tires or u ...