Toyota Corolla (E120) 2002–2008 Repair Manual / Lubrication / Lubrication system
Toyota Corolla (E120): Lubrication system
On–vehicle inspection
1. Check engine oil level
- after warming up the engine and then 5 minutes after the engine stops, oil level should be between the ”l” and ”f” marks on the oil level gage.
If low, check for leakage and add oil up to the ”f” mark.
Notice
: do not fill with engine oil above the ”f” mark.
2. Check engine oil quality
- Check the oil for deterioration, entry of water, discoloring or thinning.
If the quality is visibly poor, replace the oil.
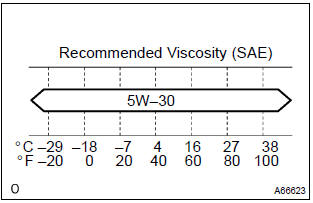
Oil grade: use api grade sl ”energy–conserving”, or ilsac multigrade engine oil.
Sae 5w–30 is the best choice for good fuel economy, and good starting in cold weather.
If sae 5w–30 is not available, sae 10w–30 may be used.
However, it should be replaced with sae 5w–30 at the next oil replacement.
3. Inspect oil pressure
- disconnect the oil pressure switch connector.
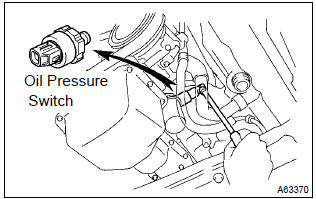
- Using a 24 mm deep socket wrench, remove the oil pressure switch.
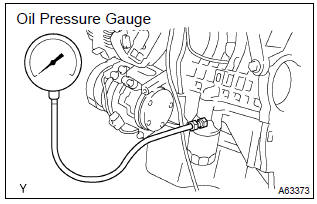
- Install the oil pressure gauge.
- warm up the engine.
- inspect the oil pressure.
Oil pressure:

- Apply adhesive to 2 or 3 threads of the oil pressure switch.
Adhesive:
part no. 08833–00080, Three bond 1344, loctite 242 or equivalent - using a 24 mm deep socket wrench, install the oil pressure
switch.
Torque: 15 nvm (153 Kgf·cm, 11 ft·lbf)
- connect the oil pressure switch connector.
- check for the engine oil leaks.


Other materials:
Steering column
Service data
Torque specification
Power steering
Service data
Torque specification
: For use without sst ...
Using the radio (Multimedia system)
Radio operation
Select “AM” or “FM” on the audio source selection screen to begin listening
to the radio.
Audio control screen
Pressing the “AUDIO” button displays the audio control screen from any screens
of the selected source.
1 Audio source selection screen appears
2 Preset ...
Display and menu icons
■ Display
Content display area
By selecting menu icons on the
multi-information display, a variety
of driving-related information can
be displayed. The multi-information
display can also be used to change
display settings and other vehicle
settings.
Warning or advice pop-up displays
are also ...