Toyota Corolla (E120): Inspection procedure
1 Check operation(overdrive)
- Drive the vehicle after the engine warms up.
- check that overdrive on e off occurs by an operation of the o/d switch on–off.


2 Inspect terminal voltage(od)
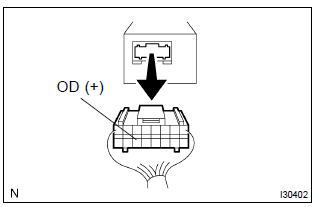
- Remove the cruise control ecu assy with the connector still connected.
- turn the ignition switch to on.
- disconnect the cruise control ecu assy connector.
- measure voltage between terminal 14 (od) of harness
side connector of cruise control ecu assy and body
ground.
Ok: voltage: 10 – 14 v


3 Inspect terminal voltage(ect)
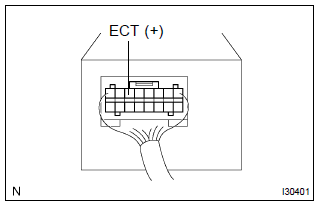
- Connect the cruise control ecu assy connector.
- perform the test drive after engine warms up.
- check voltage between terminal 6 (ect) of cruise control
ecu assy connector and body ground when o/d switch
is on and off.
Ok:


4 Check harness and connector(between cruise control ecu assy and electronically controlled transmission solenoid)
- Check for open and short circuit in harness and connector between cruise control ecu assy and electronically controlled transmission solenoid


Check and replace cruise control ecu assy
5 Check harness and connector(between cruise control ecu assy and ecm)
- Check for open and short circuit in harness and connector between cruise control ecu assy and ecm


Check and replace cruise control ecu assy


Other materials:
Overhaul
1. Remove oil pump relief valve
Remove the oil pump relief valve plug, oil pump relief
valve spring and oil pump relief valve.
Oil pump relief valve plug
oil pump relief valve spring
oil pump relief valve
2. Inspect oil pump assy
Remove 3 screws and o ...
Automatic transaxle fluid (atm)
On–vehicle inspection
1. Check the fluid level
Hint:
drive the vehicle so that the engine and transaxle are at normal
operating temperature.
Fluid temperature: 70 – 80 °c (158 – 176 °f)
park the vehicle on a level surface and set the parking
brake.
with the engin ...
Inspection procedure
Hint:
this dtc chart is on the premise that the engine is cranked normally.
If the engine is not cranked, proceed
to the problem symptoms table on page 05–42.
Read freeze frame data using the hand-held tester or the obd ii scan
tool. Freeze frame data records
the engine conditions ...