Toyota Corolla (E120) 2002–2008 Repair Manual / Introduction / Repair instruction / Precaution / Basic repair hint
Toyota Corolla (E120): Basic repair hint
(A) hints on operations

| 1 | Looks |
|
| 2 | Vehicle protection |
|
| 3 | Safe operation |
|
| 4 | Preparation of tools and measuring gauge |
|
| 5 | Removal and installation, disassembly and assembly operations |
|
| 6 | Removed parts |
|
(B) jacking up and supporting vehicle
- Care must be taken when jacking up and supporting the vehicle. Be sure to lift and support the vehicle at the proper locations
(C) precoated parts
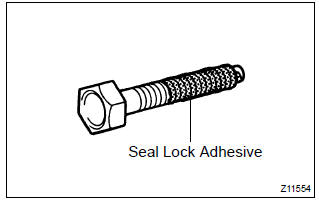
- Precoated parts are bolts, nuts, etc. That are coated with a seal lock adhesive at the factory.
- If a precoated part is retightened, loosened or caused to move in any way, it must be recoated with the specified adhesive.
- When reusing precoated parts, clean off the old
adhesive and dry the part with compressed air.
Then apply the specified seal lock adhesive to the bolt, nut or threads.
Notice
: perform the torque checking with the lower limit value of the torque tolerance.
- Depending on the seal lock agent to apply, there may be a case where it is necessary to leave it for a specified time until it hardens.
- Gaskets
(1) when necessary, use a sealer on gaskets to prevent leaks. - bolts, nuts and screws (1) carefully observe all the specifications for tightening torques. Always use a torque wrench.
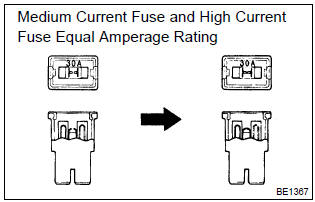
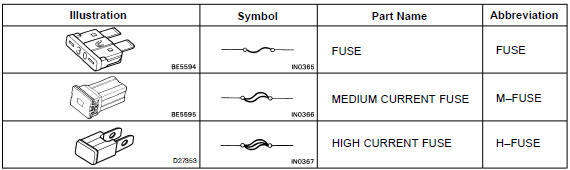
- fuses.
(1) When replacing fuses, be sure that a new fuse has the correct amperage rating. Do not exceed the rating, or use one with a lower rating.
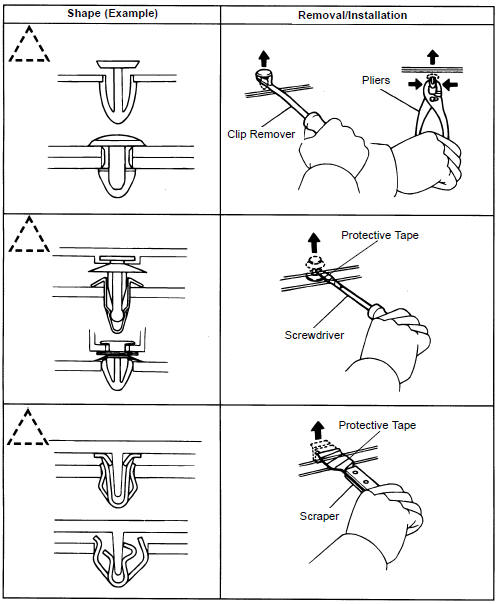
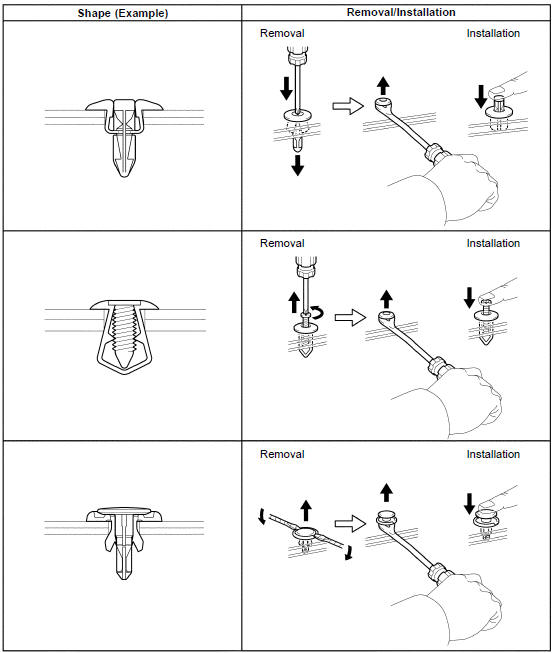
- Clips
(1) the removal and installation methods of typical clips used in body parts are shown in the table below.
Hint
: if the clip is damaged during the a procedure, always replace it with a new clip.
- Removal and installation of vacuum hoses (1) to disconnect vacuum hoses, pull them by holding the end, not the middle of the hose.
(2) When disconnecting vacuum hoses, use tags to identify where they should be reconnected.
(3) After completing the job, make a double check whether the vacuum hoses are properly connected.
A label under the hood shows the proper layout.
(4) When using a vacuum gauge, never force the hose onto a connector that is too large. Use a step–down adapter for adjustment. Once the hose has been stretched, it may leak air.
- Torque when using torque wrench with extension tool
(1) in case of tightening with a torque wrench which has
an extended length by combining the torque
wrench with sst or extension tool, if you tighten until
the reading of the torque wrench reaches the
specified torque value, the actual torque becomes
excessive.
(2) In this manual, only the specified torque is described.
In case of using sst or an extension tool, calculate the reading of the torque wrench by the following formula.
(3) Formula t’=t x l2/(l1 + l2)
| T’ | Reading of torque wrench {nvm (kgf·cm, ftvlbf)} |
| T | Torque {nvm (kgf·cm, ftvlbf)} |
| L1 | Length of sst or extension tool (cm) |
| L2 | Length of torque wrench (cm) |


Other materials:
Inspection
1. Inspect sliding roof limit switch
Inspect the sliding roof limit switch continuity.
Standard:
If the continuity is not as specified, replace the switch.
2. Inspect sliding roof drive gear sub–assy
Connect the positive (+) lead from the battery to terminal
2 and the ne ...
Replacement
Hint:
installation is in the reverse order of the removal. But the installation is
indicated only when it has a point.
1. Remove spare wheel cover assy
2. Remove rear floor finish plate
Remove the 3 clips.
using a moulding remover, remove the rear floor finish
plate.
3. Rem ...
How to register a Bluetooth® device
1 Display the “Bluetooth* Setup” screen. *: Bluetooth is a registered trademark
of Bluetooth SIG, Inc.
2 Select “Add”.
3 When this screen is displayed, search for the device name displayed on this
screen on the screen of your Bluetooth® device.
For details about operating the Bluetoo ...