Toyota Corolla (E120) 2002–2008 Repair Manual / Wiper & washer / Windshield wiper motor assy
Toyota Corolla (E120): Windshield wiper motor assy
Replacement
1. Remove windshield wiper arm cover
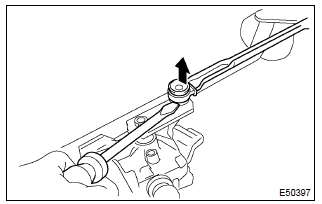
2. Remove fr wiper arm r
h
- operate the wiper and stop the windshield wiper motor assy at the automatic stop position.
- remove a nut and fr wiper arm rh.
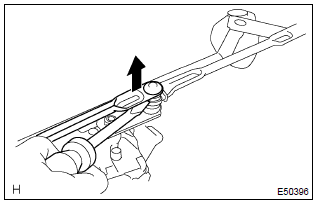
3. Remove fr wiper arm lh
- remove a nut and fr wiper arm lh.
4. Remove hood to cowl top seal
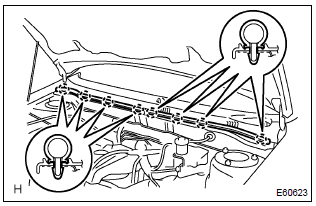
- Using a clipremover, disengage the meshing of 8 clips and remove the hood to cowl top seal.
5. Remove cowl top ventilator louver rh
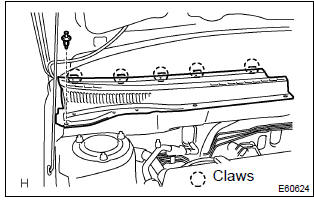
- Remove a clip and release the 5 claws, and remove the cowl top ventilator louver rh.
6. Remove cowl top ventilator louver lh
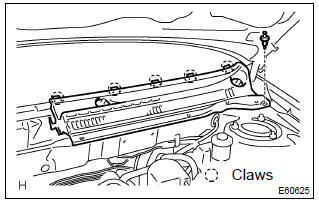
- Remove a clip and release the 5 claws, and remove the cowl top ventilator louver lh.
7. Remove wiper link assy
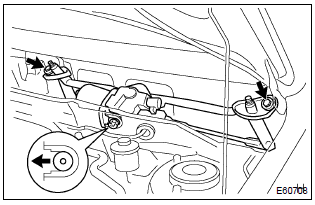
- Disconnect the connector.
- remove the 2 bolts.
- slide the wiper link assy to vehicle’s passengers side. Disengage the meshing of the rubber pin and remove the wiper link assy.
8. Remove windshield wiper motor assy
- Using a screwdriver and disengage the meshing of 2 rods at the clank arm pivot of the windshield wiper motor assy.
Hint
: tape the screwdriver tip before use.
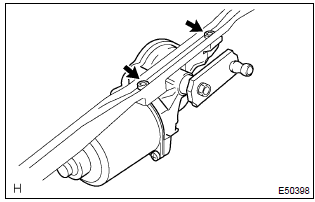
- Remove 2 torx bolts and windshield wiper motor assy.
9. Install windshield wiper motor assy
- apply mp grease to the clank arm pivot of the windshield wiper motor assy.
- using 2 torx bolts, install the windshield wiper motor assy to the
windshield wiper link assy.
Torque: 7.5 Nvm (76 kgfvcm, 66 in.Vlbf)
10. Install wiper link assy

- Install the meshing of the rubber pin.
- install the windshield wiper link assy.With the 2 bolts.
Torque: 5.5 Nvm (56 kgfvcm, 49 in.Vlbf)
- connect the connecter.
11. Install fr wiper arm lh
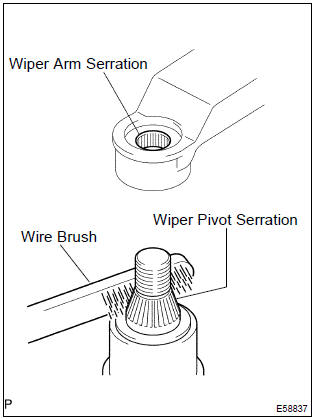
- Operate the wiper, and stop the windshield wiper motor assy at the automatic stop position.
- scrape off the serration part of the wiper arm with a round file or equivalent.
- clean the wiper pivot serration with the wire brush.
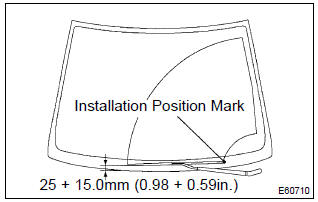
- Install the front wiper arm lh with a nut at the position as
shown in the illustration.
Torque: 20.5 Nvm (209 kgfvcm, 15 ftvlbf)
Hint
: hold down the arm hinge with hand to fasten a nut.
12. Install fr wiper arm rh
- Scrape off the serration part of the wiper arm with a round file or equivalent.
- clean the wiper pivot serration with the wire brush.
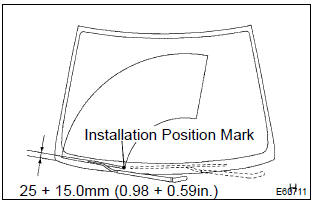
- install the front wiper arm rh with a nut to the position shown in the illustration.
Torque: 20.5 Nvm (209 kgfvcm, 15 ftvlbf)
Hint
: hold down the arm hinge with hand to fasten a nut.
- operate the wiper while running the water or the washer fluid over the window, and check the wiping condition and that the rear wiper does not hit against the vehicle body.


Other materials:
Radio broadcast cannot be received (bad reception)
Inspection procedure
1 Check if radio auto–search functions properly
Check if the radio auto–search functions properly.
Perform the auto–search of the radio and check that it functions
normally.
Standard: the radio auto–search functions properly.
2 Check optional ...
Sound quality is bad in all modes (volume is too low)
Wiring diagram
Inspection procedure
1 Adjust sound quality
Adjust the sound quality.
Operate the radio receiver assy to adjust the sound quality.
Standard: malfunction disappear.
2 Compare it with another car of same model
Compare it with another vehicle of the same mo ...
Cassette tape cannot be inserted or played
Wiring diagram
Inspection procedure
1 Check for any foreign object
Check for any foreign object.
Check that no foreign object or defect is detected in the cassette
tape player of radio receiver
assembly.
Standard: no foreign object and defect detected.
2 Check cassett ...