Toyota Corolla (E170): Rear seats
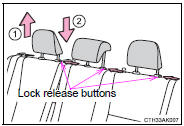
► Type A
1 Up
Pull the head restraints up.
2 Down
Push the head restraint down while pressing the lock release button.
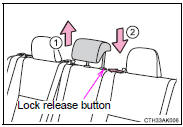
► Type B
1 Up
Pull the head restraints up.
2 Down
Push the head restraint down while pressing the lock release button.
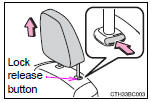
■Removing the head restraints (except for fixed rear head restraints)
Pull the head restraint up while pressing the lock release button.
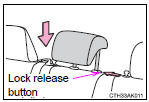
■Installing the head restraints (except for fixed rear head restraints) ►
Front seats and rear outside seats Align the head restraint with the installation holes and push it down to the lock position.
Press and hold the lock release button when lowering the head restraint.

►
Rear center seat
Align the head restraint with the installation holes and push it down to the lowest lock position while pressing the lock release button.
■Adjusting the height of the head restraints (except for fixed rear head restraints)
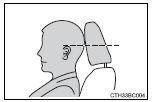
Make sure that the head restraints are adjusted so that the center of the head restraint is closest to the top of your ears.
■Adjusting the rear center seat head restraint
Always raise the head restraint one level from the stowed position when using.
CAUTION
■Head restraint precautions
Observe the following precautions regarding the head restraints. Failure to do so may result in death or serious injury.
●Use the head restraints designed for each respective seat.
●Adjust the head restraints to the correct position at all times.
●After adjusting the head restraints, push down on them and make sure they are locked in position.
●Do not drive with the head restraints removed.


Other materials:
Replacement
Hint: components:
1. Remove radiator grille sub–assy
2. Remove front bumper cover
3. Remove lh headlamp assy
Remove the 3 bolts.
pull out the headlight assy lh forward, then disconnect
the bracket of body side.
Release the claws and disconnect the connectors as
sh ...
Inspection procedure
1 Inspect park/neutral position switch assy
Disconnect the park/neutral position switch connector.
measure resistance according to the value(s) in the table
below when the shift lever is moved to each position.
Standard:
2 Check harness and connector(park/neutral position ...
Pre–check
1. Diagnosis system
Release the parking brake lever.
check the warning lights.
When the ignition switch is turned on, check that the abs
warning light and brake warning light goes on for 3 sec.
Hint:
when the parking brake is applied or the level of the brake
fluid is low, the ...