Toyota Corolla (E120): Inspection
1. Thermostat
Hint
: the thermostat is numbered with the valve opening temperature.
- Immerse the thermostat in water and gradually heat the water.
- check the valve opening temperature.
Valve opening temperature: 80 to 84 c (176 to 183 f)
Hint
: if the valve opening temperature is not as specified, replace the thermostat.
- Check the valve lift.
Valve lift: 10 mm (0.39 In.) Or more at 95 c (203 f)
Hint
: if the valve lift is not as specified, replace the thermostat.
- check that the valve is fully closed when the thermostat is at low temperatures (below 77 c (171 f)).
Hint: if not closed, replace the thermostat.
2. Radiator cap sub–assy
Notice
:
- if the radiator cap has contaminations, always rinse it with water.
- Before using a radiator cap tester, wet the relief valve and pressure valve with engine coolant or water.
- When performing step (a) and (b) below, keep the tester at an angle of over 30 above the horizontal.
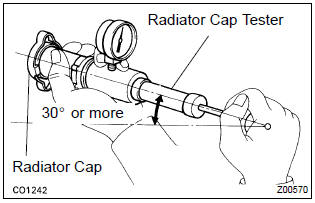
- Using a radiator cap tester, slowly pump the tester and
check that air is coming from the vacuum valve.
Pump speed: 1 push / 3 seconds or more
Notice
: push the pump at a constant speed. If air is not coming from the vacuum valve, replace the radiator cap.
- pump the tester and measure the relief valve opening
pressure.
Pump speed: 1 push within 1 second
Notice: the above pump speed is for the first pump only (in order to close the vacuum valve). After the first pump, the pump speed can be reduced. Standard opening pressure: 74 to 103 kpa (0.75 To 1.05 Kgf/cm2, 10.7 To 14.9 Psi) minimum opening pressure: 59 kpa (0.6 Kgf/cm2, 8.5 Psi)
Hint
: use the tester’s maximum reading as the opening pressure.
If the opening pressure is less than minimum, replace the radiator cap.


Other materials:
Inspection procedure
1 Inspect transmission wire(s2)
Disconnect the transmission wire connector from the
transaxle.
measure the resistance according to the value(s) in the
table below.
Standard:
2 Check harness and connector(transmission wire – ecm)
Connect the transmission connec ...
Changing gears in the M
position
To enter 10-speed sport
sequential shiftmatic mode, shift
the shift lever to M position.
Gear steps can then be selected
by operating the shift lever or
paddle shift switches, allowing
you to drive in the gear step of
your choosing.
Upshifting
Downshifting
The gear changes once every time
the ...
Inspection
1. Fuel injector assy
Inspect injector resistance.
Using an ohmmeter,measure the resistance between
the terminals.
Resistance: 13.4 – 14.2 Ω at 20 c (68 f)
Inspect injector inspection
Caution:
keep injector clear of sparks during the test.
Purch ...