Toyota Corolla (E120): Overhaul
1. Drain clutch fluid
2. Disconnect clutch release cylinder to flexible hose tube
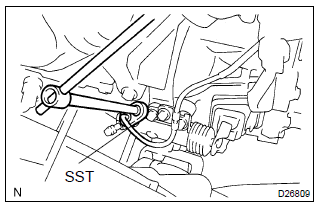
- Using sst, disconnect the flexible hose tube.
Sst 09023–00100
Hint
: use a container to catch the fluid.
3. Remove clutch release cylinder assy
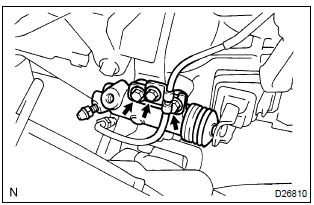
- Remove the 3 bolts, clutch release cylinder assy and clutch line bracket.
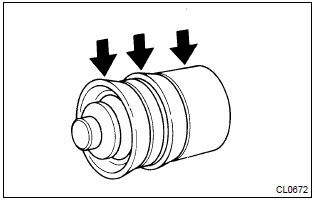
4. Remove clutch release cylinder kit
- remove the boot from the cylinder body.
- remove the push rod from the cylinder body.
- remove the piston from the cylinder body.
Notice
: be careful not to damage the inside of the cylinder body.
- remove the spring from the cylinder body.
- remove the bleeder plug cap from the bleeder plug.
5. Remove release cylinder bleeder plug
6. Install release cylinder bleeder plug
torque: 8.4 Nvm (85 Kgf·cm, 74 in.Vlbf)
7. Install clutch release cylinder kit
- Install the bleeder plug cap to the bleeder plug.
- install a new spring to the cylinder body.
- coat parts with lithium soap base glycol grease, as shown in the illustration.
- install the piston to the cylinder body.
Notice
: be careful not to damage the inside of the cylinder body.
- install the push rod to the cylinder body.
- install the boot to the cylinder body.
8. Install clutch release cylinder assy
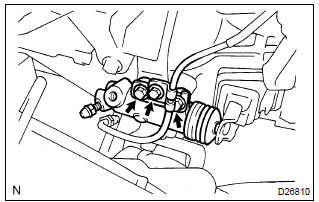
- Install the clutch release cylinder and clutch line bracket
with the 2 bolts.
Torque: 11.8 Nvm (120 Kgf·cm, 9 ft·lbf)
- install the flexible hose tube with the bolt.
Torque: 5.0 Nvm (51 Kgf·cm, 44 in.Vlbf)
9. Connect clutch release cylinder to flexible hose tube

- Using sst, connect the flexible hose tube.
Sst 09023–00100
torque: 15.2 Nvm (155 Kgf·cm, 11 ft·lbf)
10. Bleed clutch pipe line
- fill the brake reservoir tank with brake fluid and bleed clutch
system.
Torque: 8.4 Nvm (85 Kgf·cm, 74 in.Vlbf)
11. Check clutch fluid leakage


Other materials:
Head restraints
Head restraints are provided
for all seats.
WARNING
■Head restraint precautions
Observe the following precautions
regarding the head restraints.
Failure to do so may result in
death or serious injury.
Use the head restraints
designed for each respective
seat.
Adjust the head restraints to th ...
Skid control sensor
Replacement
Hint:
replace the rh side by the same procedure as the lh side.
1. Remove rear wheel
2. Remove rear brake drum sub–assy
3. Disconnect skid control sensor wire
Disconnect the skid control sensor wire connector from
the skid control sensor.
4. Remove rear axle hub & ...
Circuit description
Refer to dtc p0130
Dtc no.
Dtc detecting condition
Trouble area
P0134
After engine is warmed up, heated oxygen sensor (bank 1
sensor 1) output does not indicate rich (greater than 0.45 V)
even once when conditions (a), (b), (c), (d) and (e) continue for
...