Toyota Corolla (E120) 2002–2008 Repair Manual / Lubrication / Lubrication system
Toyota Corolla (E120): Lubrication system
On–vehicle inspection
1. Check engine oil level
- after warming up the engine and then 5 minutes after the engine stops, oil level should be between the ”l” and ”f” marks on the oil level gage.
If low, check for leakage and add oil up to the ”f” mark.
Notice
: do not fill with engine oil above the ”f” mark.
2. Check engine oil quality
- Check the oil for deterioration, entry of water, discoloring or thinning.
If the quality is visibly poor, replace the oil.
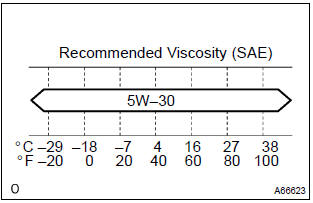
Oil grade: use api grade sl ”energy–conserving”, or ilsac multigrade engine oil.
Sae 5w–30 is the best choice for good fuel economy, and good starting in cold weather.
If sae 5w–30 is not available, sae 10w–30 may be used.
However, it should be replaced with sae 5w–30 at the next oil replacement.
3. Inspect oil pressure
- disconnect the oil pressure switch connector.
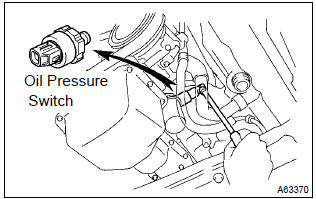
- Using a 24 mm deep socket wrench, remove the oil pressure switch.
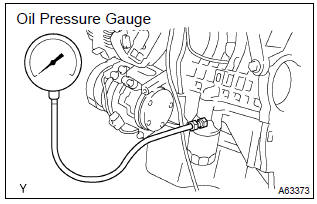
- Install the oil pressure gauge.
- warm up the engine.
- inspect the oil pressure.
Oil pressure:

- Apply adhesive to 2 or 3 threads of the oil pressure switch.
Adhesive:
part no. 08833–00080, Three bond 1344, loctite 242 or equivalent - using a 24 mm deep socket wrench, install the oil pressure
switch.
Torque: 15 nvm (153 Kgf·cm, 11 ft·lbf)
- connect the oil pressure switch connector.
- check for the engine oil leaks.


Other materials:
Replacement
1. Drain brake fluid
Notice:
wash the brake fluid off immediately if it comes into contact with any painted
surface.
2. Remove front wheel rh
3. Remove front fender liner rh
4. Remove brake actuator with bracket
turn the latch of the actuator connector to disconnect the
connector. ...
Circuit description
The p squib circuit consists of the airbag sensor assy center and instrument
panel passenger airbag assy.
It causes the srs to deploy when the srs deployment conditions are satisfied.
Dtc b0105/53 is recorded when a short is detected in the p squib circuit.
Wiring diagram
...
Canceling and resuming the constant speed control
1 Pulling the lever toward you cancels the constant speed control.
The speed setting is also canceled when the brakes are applied or the clutch
pedal (manual transmission) is depressed.
2 Pushing the lever up resumes the constant speed control.
Resuming is available when the vehicle speed is mo ...