
Toyota Corolla (E120) 2002–2008 Repair Manual / Diagnostics / Sfi system / Ecm power source circuit / Inspection procedure
Toyota Corolla (E120): Inspection procedure
1 Inspect ecm(+b voltage)
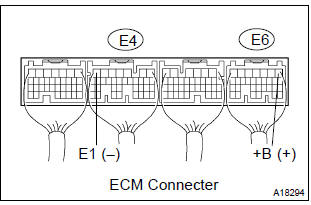
- Turn the ignition switch on.
- measure the voltage between the terminals of the e4 and e6 ecm connectors.
Standard:



2 Check harness and connector(ecm – body ground)
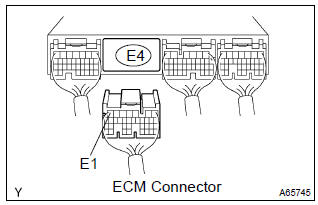
- Disconnect the e4 ecm connector.
- check the resistance between the wire harness side connectors.
Standard (check for open):

- Reconnect the ecm connector


3 Inspect ignition or starter switch assy
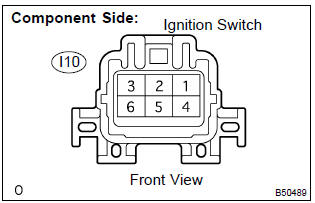
- Disconnect the i10 ignition switch connector.
- check for continuity between the connector terminals shown in the chart below.
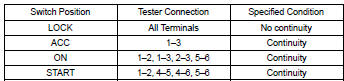
- Reconnect the ignition switch connector.


4 Check fuse(efi fuse)
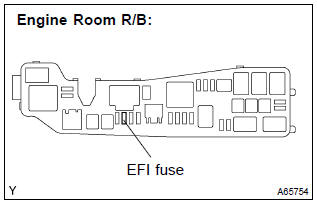
- Remove the efi fuse from the engine room r/b.
- check for continuity in the efi fuse.
Standard: continuity
- reinstall the efi fuse.


5 Inspect efi relay
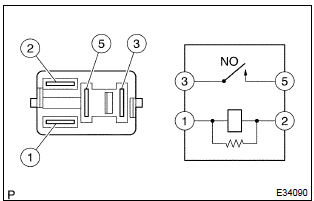
- Remove the efi relay from the engine room r/b.
- check for continuity in the circuit efi relay.
Standard:
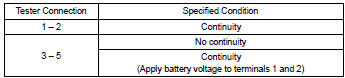
- Reinstall the efi fuse.


6 Check harness and connector(efi relay – ecm, efi relay – body ground)
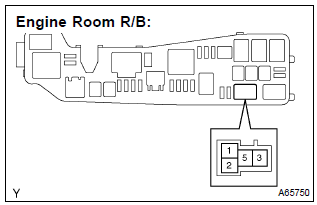
- Check the harness and connector between the efi relay and ecm.
- Remove the efi relay from the engine room r/b.
- Disconnect the e6 ecm connector.
- Check the resistance between the wire harness side connectors.
Standard (check for open):

Standard (check for short):

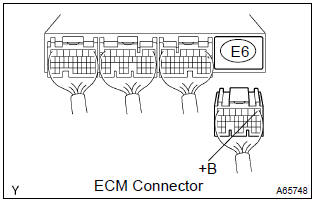
- Reconnect the ecm connector.
- Reinstall the efi relay.
- check the harness and connector between the efi relay and body ground.
- Remove the efi relay from the engine room r/b.
- Check the resistance between the wire harness side connector and body ground.
Standard (check for open):

- Reinstall the efi relay.


Check and repair harness and connector (terminal +b of ecm – battery positive terminal)


Other materials:
Installing the spare tire
1 Remove any dirt or foreign matter from the wheel contact surface.
If foreign matter is on the wheel contact surface, the wheel nuts may loosen
while the vehicle is in motion, causing the tire to come off.
2 Install the tire and loosely tighten each wheel nut by hand by approximately
the sa ...
Location of the spare tire, jack and tools
1 Luggage floor cover
2 Wheel nut wrench
3 Jack handle
4 Jack attachment*
5 Jack
6 Spare tire
7 Tool tray
*: The jack attachment is used when raising your vehicle with a floor jack.
CAUTION
■Using the tire jack
Observe the following precautions.
Improper use of the tire jack may c ...
On–vehicle inspection
1. Check fuel pump operation
Connect the hand–held tester to the dlc3.
turn the ignition switch on and hand–held tester main
switch on.
Notice:
do not start the engine.
select the active test mode on the hand–held tester.
please refer to the hand–held te ...