Toyota Corolla (E170) 2014–2019 Owners Manual / Interior features / Using the radio
Toyota Corolla (E170): Using the radio
Radio operation
Select “AM” or “FM” to begin listening to the radio.
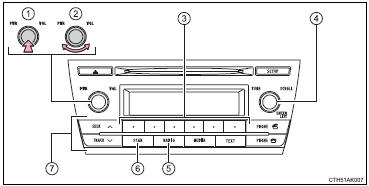
1 Power
2 Volume
3 Station selectors
4 Adjust frequency or select an item
5 AM/FM mode button
6 Scan for receivable stations
7 Seek a frequency
Setting station presets
1Search for a desired station by turning
 or pressing
 or
or
 .
.
2 Press and hold a desired station selector button until you hear a beep.
Scanning radio stations
■ Scanning preset radio stations 1
Press and hold  until you hear
a beep.
until you hear
a beep.
2 Preset stations will be played for 5 seconds each.
When the desired station is reached, press
 again.
■ Scanning all radio stations within range
1 Press  .
.
All stations with reception will be played for 5 seconds each.
2 When the desired station is reached, press
 again.
■When the battery is disconnected
Station presets are erased.
■Reception sensitivity
●Maintaining perfect radio reception at all times is difficult due to the continually changing position of the antenna, differences in signal strength and surrounding objects, such as trains, transmitters, etc.
●The radio antenna is mounted inside the rear window. To maintain clear radio reception, do not attach metallic window tinting or other metallic objects to the antenna wire mounted inside the rear window.
●When  is used, automatic station selection
may not be possible.
is used, automatic station selection
may not be possible.


Other materials:
Precaution
1. Handling precautions on srs airbag system
The vehicle is equipped with srs (supplemental restraint system) such as
the driver airbag and front
passenger airbag. Failure to carry out service operation in correct sequence
could cause the srs to
unexpectedly deploy during servicing, po ...
Steering wheel audio switches
Some audio features can be controlled using the switches on the steering wheel.
Operation may differ depending on the type of audio system or navigation system.
For details, refer to the manual provided with the audio system or navigation system.
Operating the audio system using the steering whe ...
Interior
SRS airbags
Floor mats
Front seats
Head restraints
Seat belts
Console box
Inside lock buttons
Cup holders
Rear seats
Rear seat heater switches*
*: If equipped
■Ceiling
Inside rear view mirror
Sun visors
Vanity mirrors
Vanity lights*
Interior lights/personal lights
Moon roof sw ...