Toyota Corolla (E120) 2002–2008 Repair Manual / Emission control / Engine rear oil seal
Toyota Corolla (E120): Engine rear oil seal
Replacement
1. Remove manual transaxle assy (m/t transaxle)
2. Remove automatic transaxle assy (a/t transaxle)
3. Remove clutch cover assy (m/t transaxle)
- remove the 6 bolts and clutch cover.
4. Remove clutch disc assy (m/t transaxle)
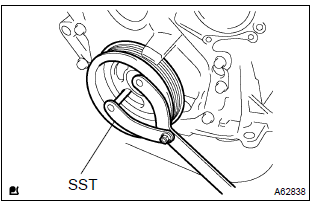
5. Remove flywheel sub–assy (m/t transaxle)
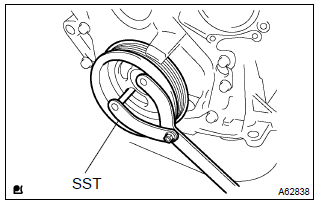
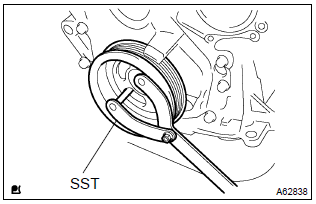
- Fix the crankshaft with sst, then remove the 8 bolts and
flywheel.
Sst 09960–10010 (09962–01000, 09963–01000)
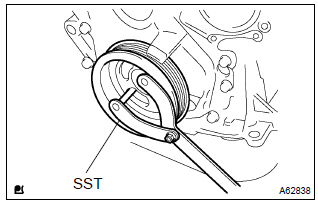
6. Remove drive plate & ring gear sub–assy (a/t transaxle)
- Fix the crankshaft with sst, then remove the 8 bolts and
drive plate & ring gear.
Sst 09960–10010 (09962–01000, 09963–01000)
7. Remove engine rear oil seal
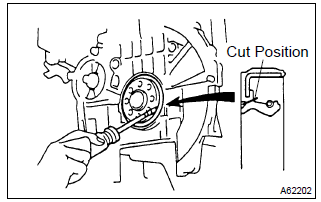
- Using a knife, cut off the oil seal lip.
- using a screwdriver with taping its tip, pry out the oil seal.
Notice
: after the removal, check if the crankshaft is not damaged.
If there is, mend it with a sandpaper (#400).
8. Install engine rear oil seal
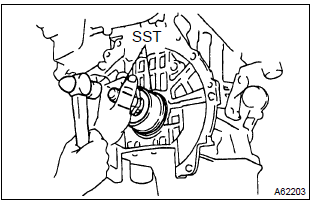
- Apply mp grease to a new oil seal lip.
Notice
: keep the lip off foreign materials.
- using sst, tap in the oil seal until its surface is flush with
the rear oil seal retainer edge.
Sst 09223–15020, 09950–70010 (09951–07100)
Notice
: wipe off extra grease on the crankshaft.
9. Install flywheel sub–assy (m/t transaxle)
- Fix the crankshaft with sst.
Sst 09960–10010 (09962–01000, 09963–01000)
- Clean the bolt and bolt hole.
- apply adhesive to the bolts.
Adhesive: part no. 09330–00070, Three bond or equivalent.
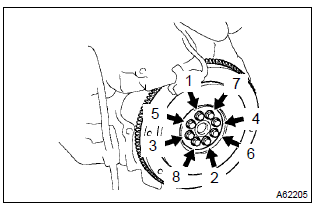
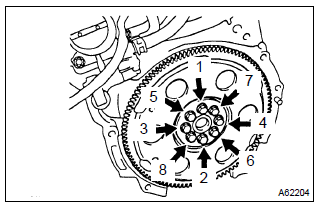
- install and uniformly tighten the 8 bolts, in several passes,
in the sequence shown.
Torque: 49 nvm (500 Kgf·cm, 36 ft·lbf)
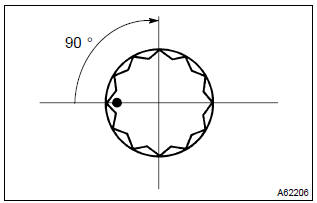
- Mark the bolts with paint.
- retighten the bolts by an additional 90 .
- check that the point marked bolts are moved at 90 angle.
10. Install clutch disc assy (m/t transaxle) sst 09301–00210
11. Install clutch cover assy (m/t transaxle)
12. Install drive plate & ring gear sub–assy (a/t transaxle)
- Fix the crankshaft with sst.
Sst 09960–10010 (09962–01000, 09963–01000)
- Clean the bolt and bolt hole.
- apply adhesive to the bolts.
Adhesive: part no. 09330–00070, Three bond or equivalent.
- install and uniformly tighten the 8 bolts, in several passes, in the sequence shown.
- fix the crankshaft with sst.
Torque: 88 nvm (897 Kgf·cm, 65 ft·lbf)
13. Install manual transaxle assy (m/t transaxle)
14. Install automatic transaxle assy (a/t transaxle)


Other materials:
Replacement
1. Work for preventing gasoline from spilling out
2. Remove front wheels
3. Remove engine under cover rh
4. Remove engine under cover lh
5. Drain coolant
6. Remove cylinder head cover no.2
Remove the 2 nuts, 2 clips and cylinder head cover.
7. Disconnect radiator hose inlet
&nb ...
Replacing a flat tire
1 Chock the tires.
2 For vehicles with steel wheels, remove the wheel ornament using the wrench.
To protect the wheel ornament, place a rag between the wrench and the wheel ornament,
as shown in the illustration.
3 Slightly loosen the wheel nuts (one turn).
4 Turn the tire jack portion ...
Cruise control system
On–vehicle inspection
1. Check play of accelerator auto drive cable assy
Push the wire into the cable so as not to move the throttle
link and put a mark on the position shown in the illustration.
Pull the wire and check the moved distance of the mark.
2. Adjust play in acce ...