Toyota Corolla (E120) 2002–2008 Repair Manual / Emission control / Timing gear cover oil seal
Toyota Corolla (E120): Timing gear cover oil seal
Replacement
1. Remove engine under cover rh
2. Remove front wheel rh
3. Remove fan and generator v belt

- Turn the v–ribbed belt tensioner slowly clockwise and loosen it. Then, remove the fan and generator belt v and put back the v–ribbed belt tensioner little by little and fix it quietly.
4. Remove engine mounting insulator sub–assy rh
- Remove the the ps oil pump reservoir and put it aside.
- place a wooden block between the jack and engine, and set the jack. Then, remove the 4 bolts, the 2 nuts and engine mounting insulator rh.

5. Remove crankshaft pulley
- Using sst, remove the crankshaft pulley bolt.
Sst 09960–10010 (09962–01000, 09963–01000)
- remove the crankshaft pulley from the crankshaft.
6. Remove timing gear cover oil seal
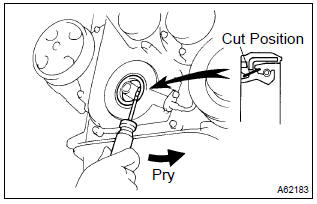
- Using a knife, cut off the oil seal lip.
- using a screwdriver with taping its tip, pry out the oil seal.
Notice
: after the removal, check if the crankshaft is not damaged.
If there is, mend it with a sandpaper (#400).
7. Install timing gear cover oil seal
- Apply mp grease to a new oil seal lip.
Notice
: keep the lip off foreign materials.
- using sst, tap in the oil seal until its surface is flush with
the timing chain cover edge.
Sst 09223–22010
N
otice
: wipe off extra grease on the crankshaft.
8. Install crankshaft pulley
- Align the pulley set key with the key groove of the pulley, and slide on the pulley.
- using sst, install the crankshaft pulley bolt.
Sst 09960–10010 (09962–01000, 09963–01000) torque: 138 nvm (1,407 Kgf·cm, 102 ft·lbf)
9. Install engine mounting insulator sub–assy rh
- Install the engine mounting insulator rh with the 4 bolts
and 2 nuts.
Torque: 52 nvm (530 Kgf·cm, 38 ft·lbf)
10. Install front wheel rh torque: 103 nvm (1050 Kgf·cm, 76 ft·lbf)
11. Check engine oil leak


Other materials:
Skid control sensor
Replacement
Hint:
replace the rh side by the same procedure as the lh side.
1. Remove rear wheel
2. Remove rear brake drum sub–assy
3. Disconnect skid control sensor wire
Disconnect the skid control sensor wire connector from
the skid control sensor.
4. Remove rear axle hub & ...
Inspection procedure
1 Check p squib circuit(airbag sensor assy center – instrument
panel passenger airbag assy)
Disconnect the negative (–) terminal cable from the battery,
and wait at least for 90 seconds.
disconnect the connectors between the airbag sensor
assy center and the instrument panel ...
Instrument panel/meter
Preparation
Sst
Recomended tools
Equipment
Seat
Preparation
Equipment
Theft deterrent & door lock
Preparation
Recomended tools
...