
Toyota Corolla (E170) 2014–2019 Owners Manual / Interior features / Using an external device (Multimedia system) / Vehicle information
Toyota Corolla (E170): Vehicle information
This screen can be used to display the fuel consumption.
“Trip Information” or “Past Record” screen
Press “CAR” to display the “Trip Information” or “Past Record” screen.
Fuel consumption
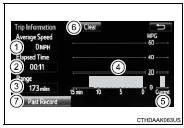
■ Trip information
If the “Trip Information” screen does not appear, select “Trip Information”.
1 Average vehicle speed
2 Elapsed time
3 Range
4 Previous fuel consumption per minute
5 Current fuel consumption
6 Reset the trip information data
7 “Past Record” screen appears
These images are examples only, and may vary slightly from actual conditions.
■ Past record
If the “Past Record” screen does not appear, select “Past Record”.
1 Previous fuel economy record
2 Current fuel economy
3 Best recorded fuel economy
4 Update the past record data
5 Reset the past record data
6 “Trip Information” screen appears
7 Average recorded fuel economy
These images are examples only, and may vary slightly from actual conditions.
■Resetting the data
Selecting “Clear” on the consumption screen will reset the consumption data.
Selecting “Clear” on the “Past Record” screen will reset the past record data.
■Updating the past record data
Selecting “Update” on the “Past Record” screen will update the past record data.


Other materials:
Monitor description
While the engine is being cranked, the battery positive voltage is applied to
terminal sta of the ecm.
If the ecm detects the starter control signal (sta) while the vehicle is
driving, it will conclude that there is
a fault in the starter control circuit. The ecm will turn on the mil and a d ...
Terminals of ecu
Oscilloscope wave (*1)
Hint:
terminal: od – gnd
gauge set: 5 v / div, 50 ms / div
condition: during cruise control driving o/d switch on.
...
Emergency flashers
The emergency flashers are used to warn other drivers when the vehicle has
to be stopped in the road due to a breakdown, etc.
Press the switch.
All the turn signal lights will flash.
To turn them off, press the switch once again.
■Emergency flashers
If the emergency flashers are used ...