Toyota Corolla (E170) 2014–2019 Owners Manual / Maintenance and care / Do-it-yourself maintenance / Light bulbs / Replacing light bulbs
Toyota Corolla (E170): Replacing light bulbs
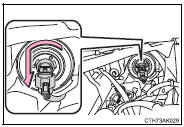
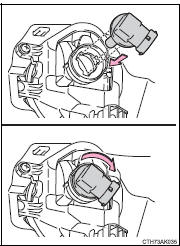
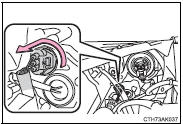
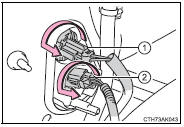
■ Headlight high beams
1 Turn the bulb base counterclockwise.
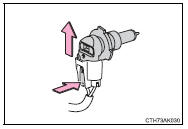
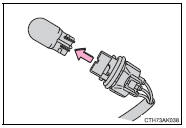
2 Pull the bulb out while pressing the lock release of the connector.
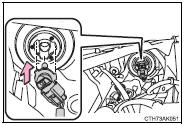
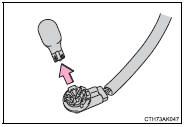
3 Replace the light bulb, and install the bulb base.
Align the 3 tabs on the light bulb with the mounting and insert.
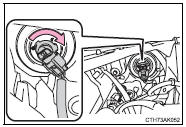
4 Turn and secure the bulb base.
Shake the bulb base gently to check that it is not loose, turn the headlights on once and visually confirm that no light is leaking through the mounting.
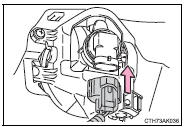
■ Front fog lights (if equipped)
1 Remove the fender liner bolts and clip.
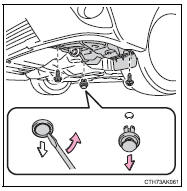
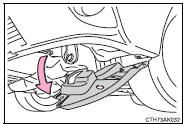
2 Partly remove the fender liner.
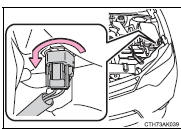
3 Unplug the connector while depressing the lock release.
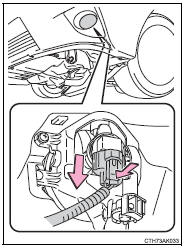
4 Turn the bulb base counterclockwise.
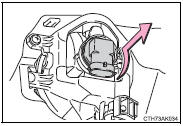
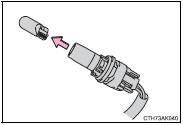
5 Install a new light bulb.
Align the 3 tabs on the light bulb with the mounting and insert.
Turn clockwise and secure the bulb base.
6 Install the connector.
Shake the connector gently to check that it is not loose, turn the front fog lights on once and visually confirm that no light is leaking through the mounting.
7 When installing the fender liner, install by conducting 2 and 1 with the directions reversed.
Make sure that the fender liner is attached to the inside of the bumper.
■ Front side marker lights
1 Turn the bulb base counterclockwise.
2 Remove the light bulb.
3 When installing, reverse the steps listed.
■ Front turn signal/parking lights
1 Turn the bulb base counterclockwise.
2 Remove the light bulb.
3 When installing, reverse the steps listed.
■ Stop/tail/rear side marker lights and rear turn signal lights
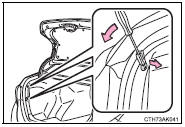
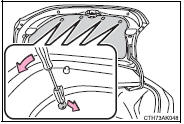
1 Open the trunk lid and remove the clips.
To prevent damage to the vehicle, cover the tip of the screwdriver with a rag.
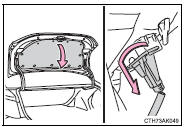
2 Partly remove the luggage trim cover.
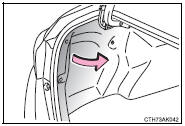
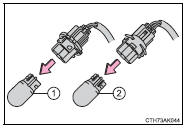
3 Turn the bulb base counterclockwise.
1 Rear turn signal light 2 Stop/tail/rear side marker light
4 Remove the light bulb.
1 Rear turn signal light 2 Stop/tail/rear side marker light
5 When installing, reverse the steps listed.
■ Back-up lights
1 Open the trunk lid and remove the cover.
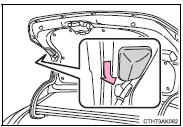
2 Turn the bulb base counterclockwise.
3 Remove the light bulb.
4 When installing, reverse the steps listed.
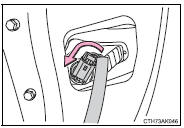
■ License plate lights
1 Open the trunk lid and remove the trunk panel cover clips.
To prevent damage to the vehicle, cover the tip of the screwdriver with a rag.
2 Partly remove the trunk panel cover and turn the bulb base counterclockwise.
3 Remove the light bulb.
4 When installing, reverse the steps listed.
■ Replacing the following bulbs
If any of the lights listed below has burnt out, have it replaced by your Toyota dealer.
● Headlight low beams/daytime running lights ● High mounted stoplights ● Side turn signal lights (if equipped)
■LED light bulbs
The high mounted stoplights and headlight low beams/daytime running lights consist of a number of LEDs. If any of the LEDs burns out, take your vehicle to your Toyota dealer to have the light replaced.
■Condensation build-up on the inside of the lens
Temporary condensation build-up on the inside of the headlight lens does not indicate a malfunction.
Contact your Toyota dealer for more information in the following situations:
●Large drops of water have built up on the inside of the lens.
●Water has built up inside the headlight.
CAUTION
■Replacing light bulbs
●Turn off the lights. Do not attempt to replace the bulb immediately after turning off the lights.
The bulbs become very hot and may cause burns.
●Do not touch the glass portion of the light bulb with bare hands. When it is unavoidable to hold the glass portion, use and hold with a clean dry cloth to avoid getting moisture and oils on the bulb.
Also, if the bulb is scratched or dropped, it may blow out or crack.
●Fully install light bulbs and any parts used to secure them. Failure to do so may result in heat damage, fire, or water entering the headlight unit. This may damage the headlights or cause condensation to build up on the lens.
■To prevent damage or fire
Make sure bulbs are fully seated and locked.


Other materials:
Definition of terms
Term
Definition
Monitor description
Description of what the ecm monitors and how it detects malfunctions
(monitoring purpose and its details).
Related dtcs
Diagnostic code
Typical enabling condition
Preconditions that allow the ecm to detect ...
Inspection procedure
1 Check p squib circuit(airbag sensor assy center – instrument
panel passenger airbag assy)
Disconnect the negative (–) terminal cable from the battery,
and wait at least for 90 seconds.
disconnect the connectors between the airbag sensor
assy center and the instrument panel ...
Inspection procedure
Hint:
this dtc chart is on the premise that the engine is cranked normally.
If the engine is not cranked, proceed
to the problem symptoms table on page 05–42.
Read freeze frame data using the hand-held tester or the obd ii scan
tool. Freeze frame data records
the engine conditions ...