Toyota Corolla (E120): Replacement
Hint
: installation is in the reverse order of the removal. But the installation is indicated only when it has a point.
1. Remove rear door opening trim rh
2. Remove rear door opening trim lh
3. Remove rear seat cushion assembly ( or 72–8)
4. Remove rear seat back assy (fixed type rear seat)
5. Remove rear seat back assy (separated type rear seat)
6. Remove rear seat side cover rh (fixed type rear seat)
7. Remove rear seat side garnish lh (fixed type rear seat)
8. Remove room partition board lh (separated type rear seat)
9. Remove room partition board rh (separated type rear seat)
10. Remove roof side garnish inner rh
11. Remove roof side garnish inner lh
12. Remove package tray trim panel assy
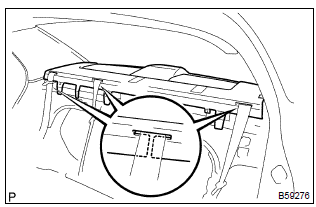
- Pull out the belt from the slit, and then remove the package tray trim panel assembly.
13. Remove rear seat 3 point type belt assy outer
- remove the bolt and disconnect the rear seat 3 point type belt assembly outer (floor anchor).
- remove the bolt and rear seat 3 point type belt assembly outer.
14. Remove rear seat inner w/center belt assy rh
- remove the 2 bolts and rear seat inner w/ center belt assembly rh.
15. Remove rear seat inner w/center belt assy lh
- remove the bolt and rear seat inner w/ center belt assembly lh.
16. Remove child restraint seat anchor bracket sub–assy rh
- remove the 2 bolts and child restraint seat anchor bracket rh.
17. Install child restraint seat anchor bracket sub–assy rh
- install the child restraint seat anchor bracket rh with the 2
bolts.
Torque: 18.1 Nvm (185 kgfvcm, 13.3 Ftvlbf)
18. Install rear seat inner w/center belt assy lh
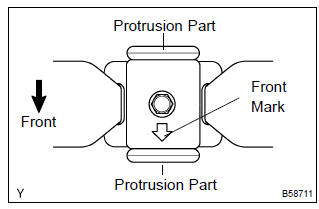
- Install the rear seat inner w/ center belt assembly rh with
the bolt, as shown in the illustration.
Torque: 41.2 Nvm (420 kgfvcm, 30 ftvlbf)
Notice
:
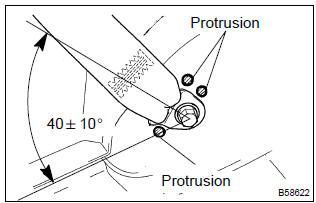
- do not make the anchor part run onto the protrusion part of the floor panel.
- Do not disassemble the retractor.
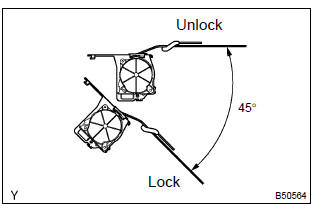
- Check the degree of tilt when the belt begins to lock the elr.
- Check that the belt will not lock within 15 degrees of tilt in all the direction but the belt will lock over 45 degrees of tilt when moving the installed retractor gently.
If the operation is not as specified, replace the rear seat belt assembly outer center.
- install the rear seat belt assembly outer center with the
bolt.
Torque: 41.2 Nvm (420 kgfvcm, 30 ftvlbf)
- check the elr lock.
Notice
: check should be performed with the assembly installed.
- Check that the belt will lock when pulling out the belt quickly with the belt installed.
If the operation is not as specified, replace the rear seat belt assembly outer center.
- check the fastening function of the child restraint system.
Notice
: check should be performed with the assembly installed.
- Check that the belt cannot be pulled out any more but can be rewound after the belt is fully pulled out.
- Check that the belt can be pulled out and rewound after the belt is fully rewound.
If the operation is not as specified, replace the rear seat belt assembly outer center.
19. Install rear seat inner w/center belt assy rh
- Install the rear seat inner w/ center belt assembly rh with
the bolt, as shown in the illustration.
Torque: 41.2 Nvm (420 kgfvcm, 30 ftvlbf)
Notice
: do not make the anchor part run onto the protrusion part of the floor panel.
20. Install rear seat 3 point type belt assy outer

Notice
: do not disassemble the retractor.
- check the degree of tilt when the belt begins to lock the elr.
- Check that the belt will not lock within 15 degrees of tilt in all the direction but the belt will lock over 45 degrees of tilt when moving the installed retractor gently.
If the operation is not as specified, replace the rear seat belt assembly outer.
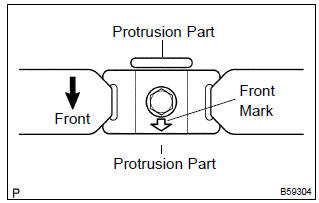
- install the rear seat belt assembly outer (retractor side)
with the bolt.
Torque: 41.2 Nvm (420 kgfvcm, 30 ftvlbf)
- Install the rear seat belt assembly outer (floor anchor
side) with the bolt.
Torque: 41.2 Nvm (420 kgfvcm, 30 ftvlbf)
Notice
: do not make the anchor part run onto the protrusion part of the floor panel.
- check the elr lock.
Notice
: check should be performed with the assembly installed.
- Check that the belt will lock when pulling out the belt quickly with the belt installed.
If the operation is not as specified, replace the rear seat belt assembly outer.
- check the fastening function of the child restraint system.
Notice
: check should be performed with the assembly installed.
- Check that the belt cannot be pulled out any more but can be rewound after the belt is fully pulled out.
- Check that the belt can be pulled out and rewound after the belt is fully rewound.
If the operation is not as specified, replace the rear seat belt assembly outer.
21. Install room partition board rh (separated type rear seat)
22. Install room partition board lh (separated type rear seat)
23. Install rear seat side garnish lh (fixed type rear seat)
24. Install rear seat side cover rh (fixed type rear seat)
25. Install rear seat back assy (fixed type rear seat)
26. Install rear seat back assy (separated type rear seat
)


Other materials:
Have the malfunction repaired immediately. (vehicles with a smart key system)
After taking the specified steps to correct the suspected problem, check that
the warning message and light go off.
■Warning buzzer ...
Light bulbs
You may replace the following
bulbs yourself. The difficulty
level of replacement
varies depending on the
bulb. If necessary bulb
replacement seems difficult
to perform, contact your
Toyota dealer.
For more information about
replacing other light bulbs,
contact your Toyota dealer.
Preparing for lig ...
Seat belt warning lamp for driver’s seat does not
operate
Wiring diagram
Inspection procedure
1 Check combination meter assy
Ground terminal c9–12 on the combination meter side.
check that the warning lightlights up.
Ok: warning light lights up.
2 Inspect front seat inner belt assy lh
Disconnect the front seat inner belt ...