Toyota Corolla (E120): Overhaul
Hint
: components:
1. Remove front wheel
2. Disconnect front stabilizer link assy lh
- Remove the nut and disconnect the front stabilizer link assy lh from the shock absorber assy front lh.
Hint
: if the ball joint turns together with the nut, use a hexagon (6 mm) wrench to hold the stud.
3. Disconnect front flexible hose
- W/ abs: remove the bolt, disconnect the front flexible hose no. 1 And speed sensor front lh.
- w/o abs: remove the bolt, disconnect the front flexible hose.
4. Remove front shock absorber with coil spring
- Remove the 2 bolts and nuts on the lower side of the shock absorber assy front lh.
Notice
: when removing the bolt, stop the bolt from rotating and loosen the nut.
- Remove the 3 nuts on the upper side of the shock absorber assy front lh.
- remove the front shock absorber with the coil spring.
5. Fix front shock absorber with coil spring
- Install 2 nuts and a bolt to the bracket at the lower side of the shock absorber assy front lh and secure it in a vise.
6. Remove shock absorber assy front lh
- Remove the front suspension support dust cover lh from the front suspension support sub–assy lh.
- using sst, compress the front coil spring lh.
Sst 09727–30021
N
otice
: do not use an impact wrench. It will damage the sst.
- Using sst to hold the front coil spring seat upper lh, remove
the nut.
Sst 09729–22031
- remove the front suspension support sub–assy lh, front suspension support lh dust seal, front coil spring seat upper lh, front coil spring insulator upper lh, front coil spring lh, front spring bumper lh and front coil spring insulator lower lh.
7. Inspect shock absorber assy front lh
- Compress and extend the shock absorber rod and check that there is no abnormal resistance or unusual sound during operation.
If there is any abnormality, replace the shock absorber with a new one.
Notice
: when disposing of the shock absorber, see disposal on page 26–12.
8. Install shock absorber assy front lh
- install the front coil spring insulator lower lh onto the shock absorber assy front lh.
- install the front spring bumper lh to the shock absorber piston rod
- Using sst, compress the front coil spring lh.
Sst 09727–30021 Notice
: do not use an impact wrench. It will damage the sst.
- install the front coil spring lh to the shock absorber assy
front lh.
Hint
: fit the lower end of the front coil spring lh into the gap of the spring lower seat.
- Install the front coil spring insulator upper lh as shown in the illustration.
- Install the front coil spring seat upper lh to the shock absorber assy front lh with the mark facing the outside of the vehicle.
- install the front suspension support lh dust seal and front suspension support sub–assy lh.
- Using sst to hold the front coil spring seat upper lh,
install a new nut.
Sst 09729–22031
torque: 47 nvm (479 Kgf·cm, 35 ft·lbf) - remove the sst.
- install the front suspension support dust cover lh.
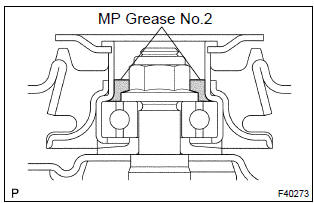
- Apply mp grease no.2 Into the suspension support sub– assy lh.
Caution
: do not touch grease on rubber surface of upper support.
9. Install front shock absorber with coil spring
- Install the shock absorber with the 2 bolts.
- install the 3 nuts to the upper side of front shock absorber
with coil spring.
Torque: 39 nvm (398 Kgf·cm, 29 ft·lbf)
- Install the 2 bolts and nuts to the lower side of front shock
absorber with coil spring.
Torque: 153 nvm (1,560 Kgf·cm, 113 ft·lbf)
N
otice
: when installing bolt, stop the bolt from rotating and torque the nut.
10. Install front flexible hose
- W/ abs:
install the front flexible hose and speed sensor front lh
with the bolt.
Torque: 29 nvm (296 Kgf·cm, 21 ft·lbf)
- w/o abs:
install the front flexible hose with the bolt.
Torque: 29 nvm (296 Kgf·cm, 21 ft·lbf)
11. Install front stabilizer link assy lh
- install the front stabilizer link assy lh with the nut.
Torque: 74 nvm (755 Kgf·cm, 55 ft·lbf)
Hint
: if the ball joint turns together with the nut, use a hexagon wrench (6 mm) to hold the stud.
12. Install front wheel torque: 103 nvm (1,050 Kgf·cm, 76 ft·lbf)
13. Inspect and adjust front wheel alignment


Other materials:
Fuel system
Precaution
1. Before working on fuel system, disconnect negative (–) terminal cable
from
battery
2. Do not smoke or work near an open flame when working on fuel system
3. Keep gasoline away from rubber or leather parts
4. Work for prevent gasoline from spilling out
Remove the rear s ...
Editing the contact data
For PBAP compatible Bluetooth® phones, this function is available when “Automatic
Contact/History Transfer” is set to off. 1 Select “Edit Contact”.
2 Select the desired contact.
3 Select corresponding to the desired name or number.
► For editing the name
Follow the steps in “R ...
Wheels
If a wheel is bent, cracked or
heavily corroded, it should
be replaced. Otherwise, the
tire may separate from the
wheel or cause a loss of
handling control.
Wheel selection
When replacing wheels, care
should be taken to ensure that
they are equivalent to those
removed in load capacity, diameter,
rim ...