Toyota Corolla (E120) 2002–2008 Repair Manual / Diagnostics / Sfi system / Vehicle speed sensor ”a” / Inspection procedure
Toyota Corolla (E120): Inspection procedure
Hint
: read freeze frame data using the hand-held tester or the obd ii scan tool. Freeze frame data records the engine conditions when a malfunction is detected. When troubleshooting, it is useful for determining whether the vehicle was running or stopped, the engine was warmed up or not, the air–fuel ratio was lean or rich, etc. At the time of the malfunction.
1 Check operation of speedometer
- Drive the vehicle and check if the operation of the speedometer in the combination meter is normal.
Hint
: the vehicle speed sensor is operating normally if the speedometer display is normal.


2 Inspect ecm(spd voltage)
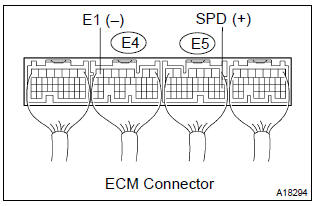
- Shift the lever to the neutral position.
- jack up the vehicle.
- turn the ignition switch on.
- check the voltage between the terminals of the e4 and e5 ecm connectors as the wheel is turned slowly.
Standard:

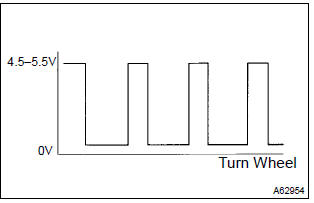
Hint
: the output voltage should fluctuate up and down similarly to the diagram on the left when the wheel is turned slowly.


Replace ecm


Other materials:
Rear suspension
Preparation
Sst
Recomended tools
Equipment
Tire & wheel
Preparation
Equipment
...
Replacement
1. Work for preventing gasoline from spilling out
2. Remove cylinder head cover no.2
Remove the 2 nuts, 2 clips and cylinder head cover.
3. Disconnect ventilation hose
Disconnect the ventilation hose from the cylinder head
cover.
4. Disconnect engine wire
Disconnect ...
Stabilizer bar front
Replacement
Hint: components:
1. Remove front wheel
2. Remove front stabilizer link assy lh
Remove the 2 nuts and stabilizer bar link.
Hint:
if the ball joint turns together with the nut, use a hexagon
wrench (6 mm) to hold the stud.
3. Remove front stabilizer link assy rh
Hint:
...