
Toyota Corolla (E120) 2002–2008 Repair Manual / Diagnostics / Sfi system / Ignition coil primary/secondary
circuit / Inspection procedure
Toyota Corolla (E120): Inspection procedure
Hint
: read freeze frame data using the hand-held tester or the obd ii scan tool. Freeze frame data records the engine conditions when a malfunction is detected. When troubleshooting, it is useful for determining whether the vehicle was running or stopped, the engine was warmed up or not, the air–fuel ratio was lean or rich, etc. At the time of the malfunction.
1 Perform simulation test
- Clear the dtc
- shuffle arrangement of the ignition coil and igniters.
Notice
: do not shuffle the connectors.
- perform the simulation test.
Result:



2 Inspect ecm(igt1, igt2, igt3, igt4 and igf signal)
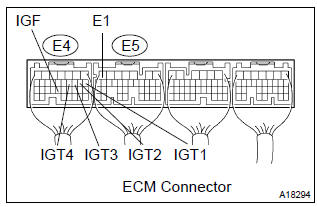
- Inspection using the oscilloscope.
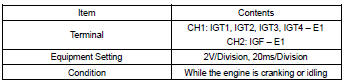
- during cranking or idling, check the waveform between terminals igt1 to igt4 and e1, igf and e1 of the ecm connector.
Standard:
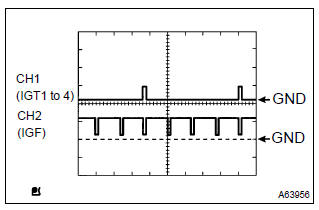
Hint
: correct waveform is as shown in the diagram on the left.


3 Check harness and connector(ignition coil assy – ecm)
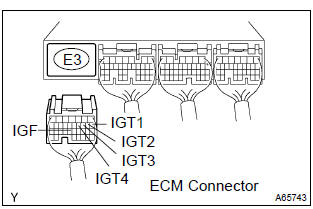
- Disconnect the i2, i3, i4 or i5 ignition coil and igniter connector.
- disconnect the e3 ecm connector.
- check the resistance between the wire harness side connectors.
Standard (check for open):
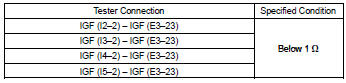
Standard (check for open):
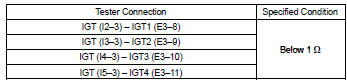
Standard (check for short):
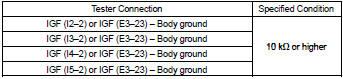
Standard (check for short):
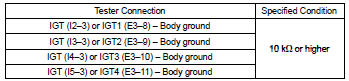
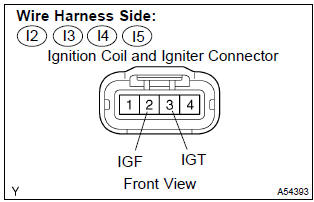
- Reconnect the ecm connector.
- reconnect the ignition coil and igniter connector


4 Inspect ignition coil assy(power source)
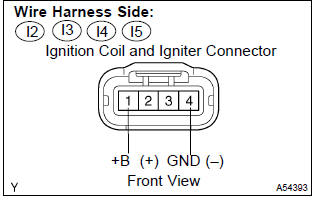
- Disconnect the i2, i3, i4 or i5 ignition coil and igniter connector.
- check the resistance between the wire harness side connectors.
Standard (check for open):
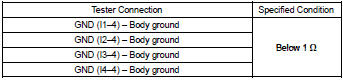
- Turn the ignition switch on position.
- measure the voltage between the terminal of the wire harness side connector and body ground.
Standard:
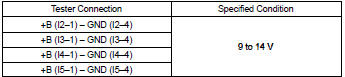
- Reconnect the ignition coil and igniter connector.


5 Check harness and connector(ignition coil assy – ignition switch)
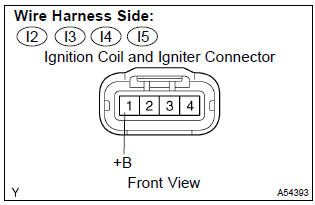
- Disconnect the i2, i3, i4 or i5 ignition coil and igniter connector.
- disconnect the i10 ignition switch connector.
- check the resistance between the wire harness side connectors.
Standard (check for open):
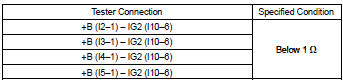
Standard (check for short):
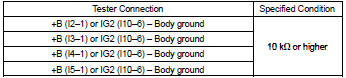
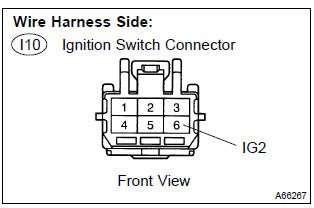
- Reconnect the ignition coil and igniter connector.
- reconnect the ignition switch connector.


Replace ignition coil assy


Other materials:
Steering column
Service data
Torque specification
Power steering
Service data
Torque specification
: For use without sst ...
Circuit description
Refer to dtc p0130
Dtc no.
Dtc detection condition
Trouble area
P0133
After engine has been warmed up, if response time that heated
oxygen sensor’s output voltage reaches from rich to lean.
Or from lean to rich, is 0.6 Second or more during idling.
...
Overhaul
1. Remove speedometer drive (mtm) gear
Remove the speedometer drive (mtm) gear from the front
differential case.
2. Remove front differential ring gear
Place matchmarks on the front differential ring gear and
front differential case.
Remove the 8 bolts. Using a hamme ...