Toyota Corolla (E120) 2002–2008 Repair Manual / Heater & air conditioner / Heater control & accessory assy
Toyota Corolla (E120): Heater control & accessory assy
Replacement
1. Remove console panel upper
2. Remove instrument cluster finish panel
3. Remove heater control & accessory assy
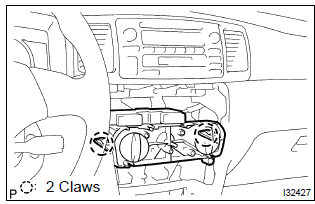
- Release the 2 fitting claws and pull out the heater control & accessory assy.
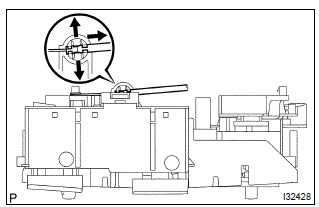
- Using a screwdriver, open the claw of the cable clamp and disconnect the defroster damper control cable.
Notice
:
- be careful not to bend the cable wire.
- If the cable wire bends, the heater control & accessory assy operationality becomes worse.
Hint
: tape the screwdriver tip before use.
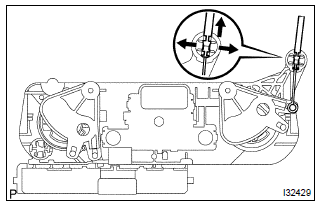
- Using a screwdriver, open the claw of the cable clamp and disconnect the air mix damper control cable.
Notice
:
- be careful not to bend the cable wire.
- If the cable wire bends, the heater control & accessory assy operationality becomes worse.
Hint
: tape the screwdriver tip before use.
- disconnect the connector, remove the heater control & accessory assy.
4. Install heater control & accessory assy
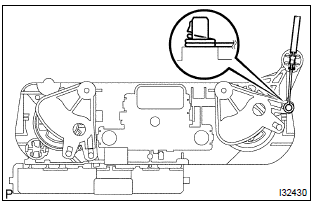
- Install the inner cable end of the air mix damper control cable to the heater control lever.
- install the outer cable of the air mix damper control cable to the cable clamp.
Notice
:
- be careful not to bend the cable wire.
- If the cable wire bends, the heater control & accessory assy operationality becomes worse.
Hint
:
- operating the heater control knob and check that it properly stops at both ends of max. Cool and max. Hot and no recoil is identified.
- Check that the outer cable should not be disengaged (moved) from the heater control & accessory assy when the cable is pulled.
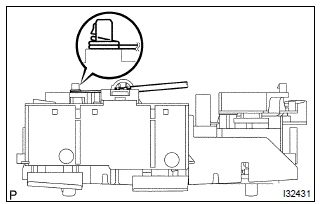
- Install the inner cable end of the defroster damper control cable to the heater control lever.
- install the outer cable of the defroster damper control cable to the cable clamp.
Notice
:
- be careful not to bend the cable wire.
- If the cable wire bends, the heater control & accessory assy operationality becomes worse.
Hint
:
- operating the heater control knob and check that it properly stops at both ends of face and def and no recoil is identified.
- Check that the outer cable should not be disengaged (moved) from the heater control & accessory assy when the cable is pulled.
- connect the connector, install the heater control & accessory assy.
Other materials:
Inspection procedure
Hint:
if dtc p0441 (purge flow), p0446 (vsv for ccv or vsv for pressure
switching valve), p0451, p0452
or p0453 is output with dtc p0442 or p0456 , first troubleshoot
dtc p0441, p0446, p0451, p0452 or p0453. If no malfunction is detected,
troubleshoot dtc
p0442 or p0456 next.
...
Displaying the device status
Select “Bluetooth* info” using .
● Displaying the device name
Select “Device Name” using .
● Displaying the device address
Select “Device Address” using .
*: Bluetooth is a registered trademark of Bluetooth SIG, Inc. ...
Starting the engine
1 Continuously variable transmission: Ensure that the shift lever is in P and
depress the brake pedal.
Manual transmission: Shift the shift lever to N and depress the clutch pedal.
2 Touch the Toyota emblem side of the electronic key to the engine switch.
When the electronic key is detected, a ...


