Toyota Corolla (E170) 2014–2019 Owners Manual / Instrument cluster / Gauges and meters (multi-information display) / Customizing vehicle features
Toyota Corolla (E170): Customizing vehicle features
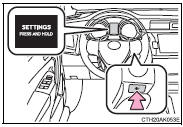
It is possible to customize the language and Eco Driving Indicator Light settings using the “DISP” switch.
When customizing vehicle features, ensure that the vehicle is parked in a safe place with the shift the shift lever to P (continuously variable transmission) or N (manual transmission) and the parking brake set.
1 Press the “DISP” switch to display the setting screen while the vehicle is stopped, and then press and hold the “DISP” switch to display the customize mode screen.
2 Press the “DISP” switch to select the item to be set, then press and hold the “DISP” switch.
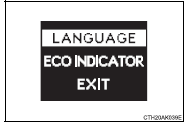
3 Press the “DISP” switch to select the desired setting, and then press and hold the “DISP” switch.

To go back to the previous screen or exit the customize mode, press the “DISP” switch to select “EXIT”, and then press and hold the “DISP” switch.
■ Items that can be changed
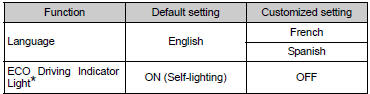
*: Except vehicles with a manual transmission
■The meters and display illuminate when
►Vehicles without a smart key system The engine switch is in the “ON” position.
►Vehicles with a smart key system The engine switch is in IGNITION ON mode.
■When disconnecting and reconnecting battery terminals
The following information data will be reset:
●Driving range
●Average vehicle speed
●Elapsed time
●Average fuel consumption
■Liquid crystal display
Small spots or light spots may appear on the display. This phenomenon is characteristic of liquid crystal displays, and there is no problem continuing to use the display.
■Setting display automatic suspension
In the following situations, the setting display will be suspended.
●When a message appears.
●When the vehicle begins to move.
CAUTION
■The display at low temperatures
Allow the interior of the vehicle to warm up before using the display. At extremely low temperatures, the display monitor may respond slowly, and display changes may be delayed.
For example, there is a lag between the driver’s shifting and the new gear number appearing on the display. This lag could cause the driver to downshift again, causing rapid and excessive engine braking and possibly an accident resulting in death or injury.
■Cautions during setting up the display
As the engine needs to be running during setting up the display, ensure that the vehicle is parked in a place with adequate ventilation. In a closed area such as a garage, exhaust gases including harmful carbon monoxide (CO) may collect and enter the vehicle. This may lead to death or a serious health hazard.
NOTICE
■To prevent damage to the engine and its components
●Do not let the indicator needle of the tachometer enter the red zone, which indicates the maximum engine speed.
●The engine may be overheating if the engine coolant temperature gauge are in the red zone. In this case, immediately stop the vehicle in a safe place, and check the engine after it has cooled completely.


Other materials:
Windshield wipers and washer
Operating the lever can use
the windshield wipers or the
washer.
NOTICE
■When the windshield is dry
Do not use the wipers, as they
may damage the windshield.
Operating the wiper lever
Operating the lever operates
the wipers or washer as follows.
(U.S.A.) or
(Canada)
Intermittent windshield ...
The ambient temperature does not display
Wiring diagram
Inspection procedure
1 Inspect outer ambient temperature sensor
Remove cooler (ambient temp. Sensor) thermistor.
measure resistance between terminals 1 and 2 of cooler
(ambient temp. Sensor) thermistor connector at each temperature.
Resistance:
at 0 c (0 f) ...
Body dimension drawings
Engine compartment
Body opening areas (side view: front)
Body opening areas (side view: rear)
Sedan
Body opening areas (rear view)
Sedan
Under body
Under body
Front suspension crossmember
Front suspension crossmember
...