Toyota Corolla (E170) 2014ŌĆō2019 Owners Manual / Interior features / Using the radio (Multimedia system)
Toyota Corolla (E170): Using the radio (Multimedia system)
Radio operation
Select ŌĆ£AMŌĆØ or ŌĆ£FMŌĆØ on the audio source selection screen to begin listening to the radio.
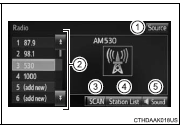
Audio control screen
Pressing the ŌĆ£AUDIOŌĆØ button displays the audio control screen from any screens of the selected source.
1 Audio source selection screen appears
2 Preset stations
3 Scanning for receivable station
4 Select to display a list of receivable stations
5 Setting the sound
Selecting a station
Tune in to the desired station using one of the following methods.
■ Seek tuning
Press the ŌĆ£∧ŌĆØ or ŌĆ£∨ŌĆØ button on ŌĆ£SEEK/TRACKŌĆØ.
The radio will begin seeking up or down for a station of the nearest frequency and will stop when a station is found.
■ Manual tunin
g Turn the ŌĆ£TUNE/SCROLLŌĆØ knob.
■ Preset stations
Select the desired preset station.
Setting station presets
1 Search for desired stations by turning the ŌĆ£TUNE/SCROLLŌĆØ knob or pressing the ŌĆ£∧ŌĆØ or ŌĆ£∨ŌĆØ button on ŌĆ£SEEK/TRACKŌĆØ.
2 Select ŌĆ£(add new)ŌĆØ.
To change the preset station to a different one, select and hold the preset station.
3 Select ŌĆ£YesŌĆØ.
4 Select ŌĆ£OKŌĆØ after setting the new preset station.
■ Refreshing the station list
1Select ŌĆ£RefreshŌĆØ on the ŌĆ£Station ListŌĆØ screen.
To cancel the refresh, select ŌĆ£Cancel RefreshŌĆØ.
■Reception sensitivity
●Maintaining perfect radio reception at all times is difficult due to the continually changing position of the antenna, differences in signal strength and surrounding objects, such as trains, transmitters, etc.
●The radio antenna is mounted inside the rear window. To maintain clear radio reception, do not attach metallic window tinting or other metallic objects to the antenna wire mounted inside the rear window.


Other materials:
Using the steering wheel switches
The steering wheel switches can be used to operate a connected cellular phone.
Operating a telephone using the steering wheel switches
■ Steering wheel switches on the right hand side
1 Off hook switch
ŌĆó Make a call
ŌĆó Receive a call
ŌĆó Display ŌĆ£PhoneŌĆØ screen
2 On hook switch
Ō ...
OnŌĆōvehicle inspection
1. Check fuel pump operation
Connect the handŌĆōheld tester to the dlc3.
turn the ignition switch on and handŌĆōheld tester main
switch on.
Notice:
do not start the engine.
select the active test mode on the handŌĆōheld tester.
please refer to the handŌĆōheld te ...
Inspection procedure
1 Check fuse(ecuŌĆōig)
Remove the ecuŌĆōig fuse from the instrument panel j/b.
check the continuity of the ecuŌĆōig fuse.
Ok: continuity
2 Inspect terminal voltage(b)
Remove the cruise control ecu assy with connector still
connected.
turn the ignition switch ...