Toyota Corolla (E120): Replacement
Hint
: installation is in the reverse order of the removal. But the installation is indicated only when it has a point.
1. Remove radiator grille sub–assy
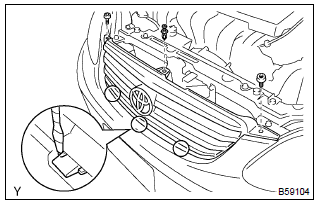
- Remove the 2 bolts and clip.
- using a screwdriver, remove the radiator grille.
Hint
: tape the screwdriver tip before use.
2. Remove front bumper cover
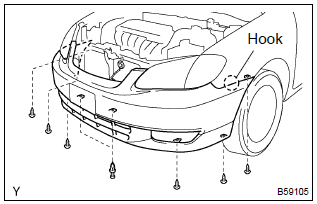
- Remove the 6 screws and 2 clips.
- disengage the hook, and remove the front bumper cover.
- w/ fog light: disconnect the fog light connectors.
3. Remove front bumper energy absorber
4. Remove front bumper reinforcement
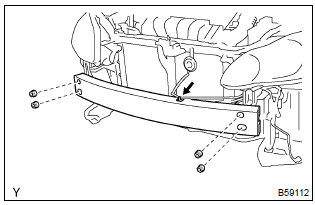
- Disconnect the wire harness clamp.
- remove the 4 nuts and front bumper reinforcement.
5. Remove front bumper side mounting bracket lh
6. Remove front bumper side mounting bracket rh
7. Remove front lh spoiler sub–assy (w/ front spoiler)
- remove the screw and 4 retainers.
- disengage the clip and front lh spoiler.
- employ the same manner described above to the other side.
8. Remove front rh spoiler sub–assy (w/ front spoiler)
9. Remove fog light unit lh (w/ fog light)
- remove the nut and fog light unit.
- employ the same manner described above to the other side.
10. Remove fog light unit rh (w/ fog light)
11. Remove front bumper hole cover lh (w/o fog light)
12. Remove front bumper hole cover rh (w/o fog light)
13. Install front bumper reinforcement
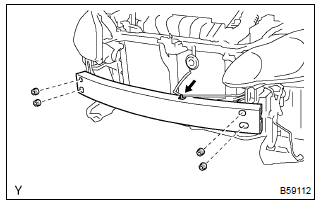
- Install the front bumper reinforcement with the 4 nuts.
Torque: 36 nvm (367 kgfvcm, 27 ftvlbf)
14. Install radiator grille sub–assy

- Install the radiator grille with the 2 bolts and clip.
Torque: 5.0 Nvm (51 kgfvcm, 44 in.Vlbf)


Other materials:
If your vehicle overheats
The following may indicate
that your vehicle is overheating.
The engine coolant temperature
gauge is in the red zone or a loss
of engine power is experienced.
(For example, the
vehicle speed does not
increase.)
"Engine Coolant Temp High
Stop in a Safe Place See
Owner's Manual" is shown
on ...
Circuit description
The seat belt buckle switch (lh) circuit consists of the airbag sensor assy
center and front seat inner belt
assy (lh).
Dtc b0126/b0127/27 is recorded when a malfunction is detected in the seat belt
buckle switch (lh) circuit.
Wiring diagram
...
Data list/active test
1. Data list
Hint:
according to the data list displayed by the obd ii scan tool or hand–held
tester, you can read the value
of the switch, sensor, actuator and so on without parts removal. Reading the
data list as the first step of
troubleshooting is one method to shorten labor time.
W ...