Toyota Corolla (E170): Front seats
Adjustment procedure
► Manual seat
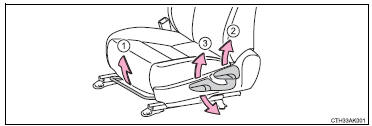
1 Seat position adjustment lever 2 Seatback angle adjustment lever 3 Vertical height adjustment lever (driver’s side only)
► Power seat (driver’s side only)
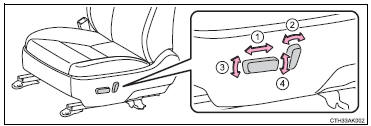
1 Seat position adjustment switch 2 Seatback angle adjustment switch 3 Seat cushion (front) angle adjustment switch 4 Vertical height adjustment switch
CAUTION
■Seat adjustment
●Be careful that the seat does not hit passengers or luggage.
●Do not recline the seat more than necessary when the vehicle is in motion to reduce the risk of sliding under the lap belt.
If the seat is too reclined, the lap belt may slide past the hips and apply restraint forces directly to the abdomen or your neck may contact the shoulder belt, increasing the risk of death or serious injury in the event of an accident.
●Manual seat only: After adjusting the seat, make sure that the seat is locked in position.
■When adjusting the seat positions
Make sure to leave enough space around the feet so they do not get stuck.


Other materials:
Message Settings
1 Display the “Phone/Message Settings” screen. 2 Select “Messaging Settings”.
3 Select the desired item to be set.
1 Set automatic message transfer on/off.
2 Set automatic message readout on/off.
3 Set the SMS/MMS notification popup on/off.
4 Set the e-mail notification popup on/off.
5 ...
Wiper & washer
Preparation
Sst
Recomended tools
Equipment
...
Inspection procedure
1 Check p squib circuit(airbag sensor assy center – instrument
panel passenger airbag assy)
Disconnect the negative (–) terminal cable from the battery,
and wait at least for 90 seconds.
disconnect the connectors between the airbag sensor
assy center and the instrument panel ...