Toyota Corolla (E120): Replacement
Hint
: components:
1. Remove floor shift shift lever knob sub–assy
2. Remove console panel upper
3. Remove parking brake hole cover sub–assy
4. Remove console box sub–assy rear
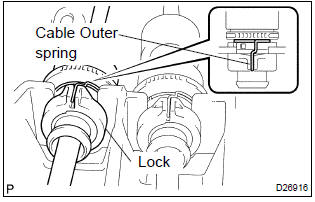
5. Separate floor shift cable transmission control shift
- Separate the end of the shift cable from the shift lever assy.
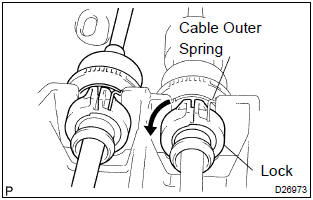
- Using a screwdriver, release the cable outer spring.
- turn the lock, separate the shift cable from the shift lever retainer.
6. Separate floor shift cable transmission control select
- Separate the end of the select cable from the shift lever assy.
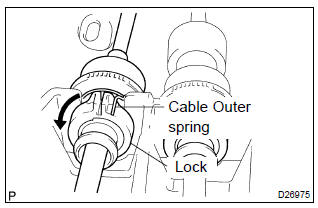
- Using a screwdriver, release the cable outer spring.
- turn the lock, separate the select cable from the shift lever retainer.
7. Remove floor shift shift lever assy
- Remove the 4 bolts and shift lever assy.
8. Install floor shift shift lever assy
- Install the shift lever assy with the 4 bolts.
Torque: 12 nvm (120 Kgf·cm, 9 ft·lbf)
9. Connect floor shift cable transmission control shift
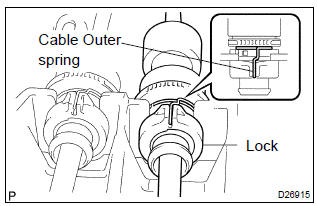
- Connect the shift cable to the retainer of shift lever assy,
turn the lock.
Notice
: the projecting part of the lock should face upward when the shift cable is installed.
- install the cable outer spring to the lock.
Notice
: make sure that after installation the cable outer spring is moved to the place shown in the illustration.
- Connect the end of the shift cable to the shift lever assy.
10. Connect floor shift cable transmission control select
- connect the select cable to the retainer of shift lever assy,
turn the lock.
Notice
: the projecting part of the lock should face upward when the select cable is installed.
- install the cable outer spring to the lock.
Notice
: make sure that after installation the cable outer spring is moved to the place shown in the illustration.
- Connect the end of the select cable to the shift lever assy.


Other materials:
Installing child restraints using a seat belt
■ Rear-facing - Infant seat/convertible seat
1 Place the child restraint system on the rear seat facing the rear of the vehicle.
2 Run the seat belt through the child restraint system and insert the plate into
the buckle. Make sure that the belt is not twisted.
3 Fully extend the shou ...
Replacement
1. Remove engine under cover rh
2. Remove fan and generator v belt
3. Remove generator assy
Disconnect the wire clamp from the wire clip on the rectifire
end frame.
remove the rubber cap and nut, and disconnect the alternator
wire.
disconnect the alternator connecto ...
Inspection procedure
1 Check voltage at ig2 of airbag sensor assy center
Disconnect the negative (–) terminal cable from the battery,
and wait at least for 90 seconds.
disconnect the connector of the airbag sensor assy center.
connect the negative (–) terminal cable to the battery,
and wa ...