Toyota Corolla (E120): Overhaul
1. Remove bench type rear seat cushion assy
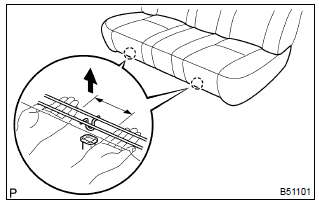
- Disengage the 2 clamps, and then remove the seat cushion.
2. Remove separate type rear seat back assy
- lean the seat back forward.
- remove the 2 clips.
- remove the 2 bolts and seat back lh.
- employ the same manner described above to the other side.
3. Remove bench type rear seat cushion cover
- remove the hog rings and seat cushion cover.
4. Remove separate type rear seat back cover
- remove the hog rings, and then turn up the seat back cover lh.
- remove the headrest supports, seat back cover lh and seat back pad lh.
- employ the same manner described above to the other side.
5. Install separate type rear seat back cover
- install the seat back pad lh to the seat back frame lh.
- cover the top of the seat back with the seat back cover lh.
- install the headrest supports.
- using hog ring pliers, fully install the seat back cover lh with new hog rings.
- employ the same manner described above the other side.
6. Install bench type rear seat cushion cover
- using hog ring pliers, install the seat cushion cover with new hog rings.
7. Install separate type rear seat back assy
- install the seat back lh with the 2 bolts and 2 clips.
Torque: 18 nvm (185 kgfvcm, 13 ftvlbf)
- employ the same manner described above to the other side.
8. Install bench type rear seat cushion assy
- insert the seat cushion under the seat back.
- engage the 2 clamps.


Other materials:
Inspection procedure
1 Inspect cruise control actuator assy
Inspect the cruise control actuator arm locking operation.
Turn the ignition switch to off.
Disconnect the cruise control actuator assy connector.
Connect the positive (+) lead from the battery to the
terminal 3 (l) of crui ...
Hydraulic test
1. Perform hydraulic test
Measure the line pressure.
Notice:
Do the test at normal operation atf temperature 50 to 80 °c (122 to
176 °f).
The line pressure test should always be carried out in pairs. One
technician should observe
the conditions of wheels or wheel stopper outsi ...
Initialization
1. Reset memory
Caution:
perform the reset memory (at initialization) when replacing the automatic
transaxle assy, engine
assy or ecm.
Notice:
hand–held tester only
Turn the ignition switch off.
connect the hand–held tester to the dlc3.
turn the ignition switch to th ...