Toyota Corolla (E170): Message Settings
1 Display the “Phone/Message Settings” screen. 2 Select “Messaging Settings”.
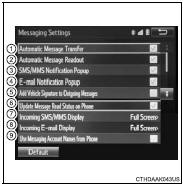
3 Select the desired item to be set.
1 Set automatic message transfer on/off.
2 Set automatic message readout on/off.
3 Set the SMS/MMS notification popup on/off.
4 Set the e-mail notification popup on/off.
5 Set adding the vehicle signature to outgoing messages on/off.
6 Set updating message read status on phone on/off.
7 Change the incoming SMS/MMS display.
“Full Screen”: When an SMS/MMS message is received, the incoming SMS/MMS display screen is displayed and can be operated on the screen.
“Drop-Down”: When an SMS/MMS message is received, a message is displayed on the upper side of the screen.
8 Change the incoming e-mail display.
“Full Screen”: When an e-mail is received, the incoming e-mail display screen is the displayed and can be operated on the screen.
“Drop-Down”: When an e-mail is received, a message is displayed on the upper side of the screen.
9 Set display of messaging account names on the inbox tab on/off.
When set to on, messaging account names used on the cellular phone will be displayed.
■To return to the default volume settings
Select “Default”, and then “Yes”.
■ Displaying the “Messaging Settings” screen in a different way
1 Display the phone screen.
2 Select  .
.
3 Select “Settings”.
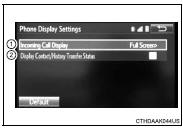
1 Change the incoming call display.
“Full Screen”: When a call is received, the hands-free screen is displayed and can be operated on the screen.
“Drop-Down”: A message is displayed on the upper side of the screen.
2 Set display of the contact/ history transfer completion message on/off.


Other materials:
Replacing a flat tire
1 Chock the tires.
2 For vehicles with steel wheels, remove the wheel ornament using the wrench.
To protect the wheel ornament, place a rag between the wrench and the wheel ornament,
as shown in the illustration.
3 Slightly loosen the wheel nuts (one turn).
4 Turn the tire jack portion ...
Inspection procedure
1 Inspect shift solenoid valve(sl)
Remove the shift solenoid valve sl.
measure the resistance according to the value(s) in the
table below.
Standard:
Connect the positive (+) battery lead to the solenoid connector
terminal, and the negative (–) battery lead to the
so ...
Check dlc3
The vehicle’s ecm uses the iso 9141–2 for communication
protocol. The terminal arrangement of the dlc3 complies
with sae j1962 and matches the iso 9141–2 format.
Hint:
if the display shows unable to connect to vehicle
when you have connected the cable of the obd ii scan tool or
the h ...